


-

Link on image
CAMILLE
DE
JOANNE

MATÉRIEL
you'll need one image of background, flowers or others

Thank you to DBK Tubes
LINDA for the mask.
and author of floral image and vase of flowers.
FILTRES
Flaming Pear, Flood
Graphics Plus
1 - place texture in textures files
2 - open a transparent layer 800x600 pxls
3 - copy the background image, flowers or else , and copy as new layer
4 - adjust, blur, gaussian blur at 15
5 - effects, art media , brushstrokes :

6 - Flaming Pear, Flood :
(click on square and put here color 484a6e or the color of your choice)

7 - close visibility of layer
8 - open a new layer, select, select all
9 - édition, paste in selection the background image still in memory
10 - deselect
11 Layer, new layer of mask from image :
LF Mask 215

12 - Merge groupe
13 - duplicate layer. Merge all visible layers
14 - effects, réflexion effects, rotatif mirror

15 - Plugin Graphics Plus, Panel Stripes :

16 - duplicate layer. go on layer just under
17 - image, resize at 90 %, all layers not checked
18 -Layers, merged all visible layers
19 - effects, distorsion effects, warp :

20 - effects,image effects, offset :

21 - open visibility of the layer, the close one.
merged all visibles layers
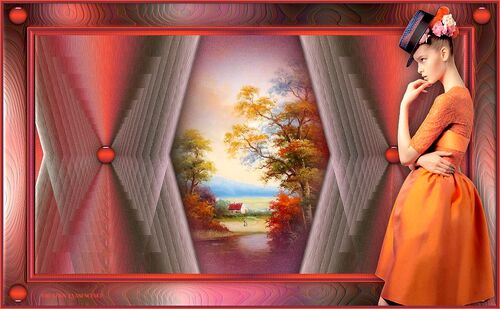
22 - copy and paste the tube of vase of flowers
. Image, resize at 110 %
23 - copy and paste woman tube, resize at 70 %
24 - adjust the 2 tubes as model
25 - drop shadow on those 2 layers

26 - copy and paste my watermark in material
27 - sign your creation
28 - merge all layers, flatten
29 - image, add borders
1 border of 2 pixels black
1 border of 30 pixels couleur 52428d or yours
1 border of 2 pixels black
30 - With magic wand, sélect border of 30 pixels
31 - effects, textures effects, texture :
take Tissage mosaique

32 - effects, 3D, inner bewel :

33 - Plugin Graphics Plus, Cross Shadow , défaut. Deselect
34 - save as JPEG
Thank you for having followed my tutorial
I hope you liked it
Joanne
Ma version
Tube femme de Maryse
Tube fleur de Maryse
que je remercie

-
Pour accéder aux tutos des créateurs
cliquez sur le cœur
en dessous de leurs
bannières

-

Derniers Articles
-

Lumières d' Automne
-


-


-


-


-


-


-


-

-


-


-


-


-


-


-

-

cliquez sur le logo au dessus site amis pour ouvrir la page
-

-

-


-


Pour mettre mes bannières
sur votre site ,cliquez sur l'une d'elles vous aurez les codes pour les incorporer
To put my banner on your site, just click on anyone of the two you have and you will have the codes on the opening page
-
-

-
Allez visiter le site de Rénée Graphisme pour vos filtres et plein d'autres choses encore

-
Livre d' Or


