


-

Link on image
PRINTEMPS
FROM
ROSE DES SABLES
MATERIAL
Click on flower to download
I thanks particulary for tubes
Corinne Vicaire –Alejandra Rosales-DWTUBES-Apo3_Groupe Schares
PLUGINS
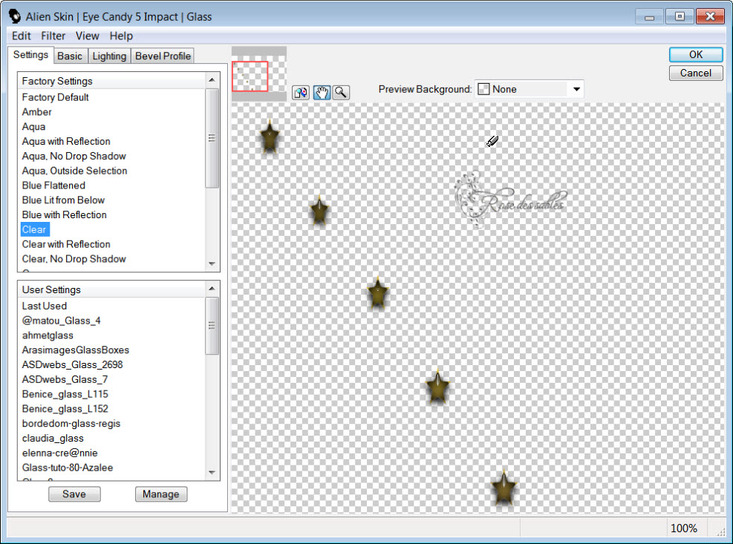
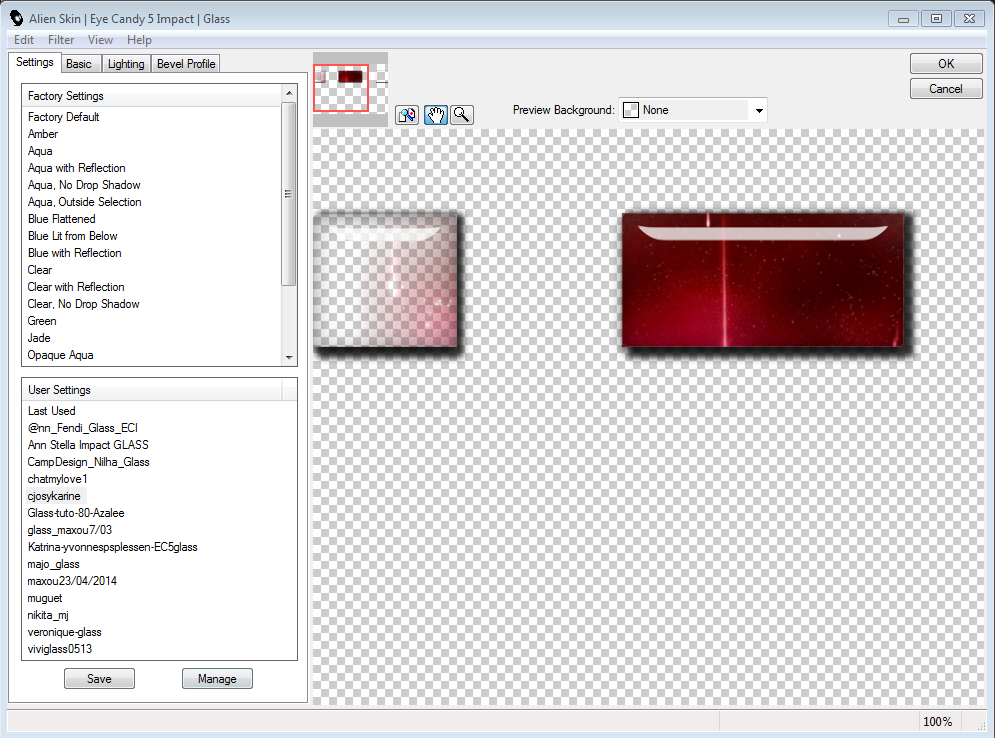
Alien Skin/Impact/Glass -Texture Frame

Foreground : #eccd3e
Background: #896155
1/Open canal alpha in material/make a copy which will serve for your tag
Fill up with a linear gradient

Rename this layer ' FOND "
2/On this layer/Sélection/charge a selection from canal alpha called Sélection 1
Promoted selection to layer

3/Fill it up with gradient/Promote selection to layer/ Désélect /
rename it as selection 1
4/Effects/ Texture Effects / blinds :

5/Effet 3D/Drop Shadow :
5 H 5V opacity 25 blur 10 black coor
6/Effet Géométrique/Perspective verticale :

Duplicate layer and resize it at 80%, all layers not checked
and push it on corner as shown on capture

8/Merged down with the layer bellow
9/Add a new layer/Sélection/charge sélection from canal apha Sélection 2
Promoted selection as layer
10/Fill up with gradient/Plugin Alien Skin/Impact/Glass :
11/Désélect/push a little the stars to the top/rename this layer as selection 2
12/Merged down layer
13/Copy and paste as new layer Apo3-fractal
Effects, effects image, seamless tiling

14/Blend mode Luminance L, legacy /Opacity at 50/Place this layer above the one called Fond/
Move it to the bottom of tag/rename it FRACTAL
15/Layer/New layer/Sélection/charge from canal Alpha/Printemps Sélection 3Promote selection to layer
16/Fill it up with your gradient / Texture Effects, Blinds :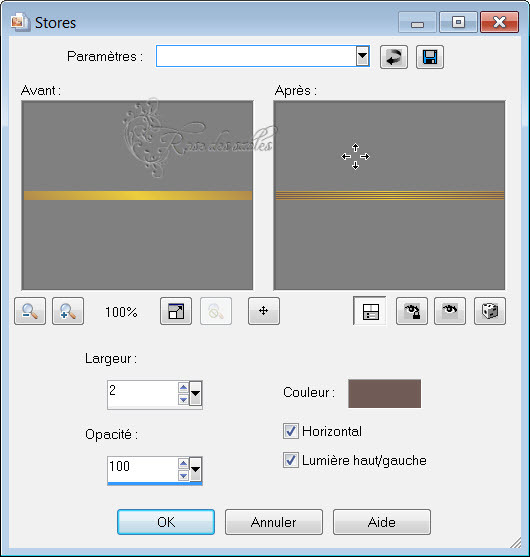
17/Désélect
18/ Géométrique effects/Skew
19/Duplicate/ resize at 80%/ push it down the first one on the right:

20/Add new layer/Sélection/charge from canal Alpha/choose Sélection 4
Promote selection to layer
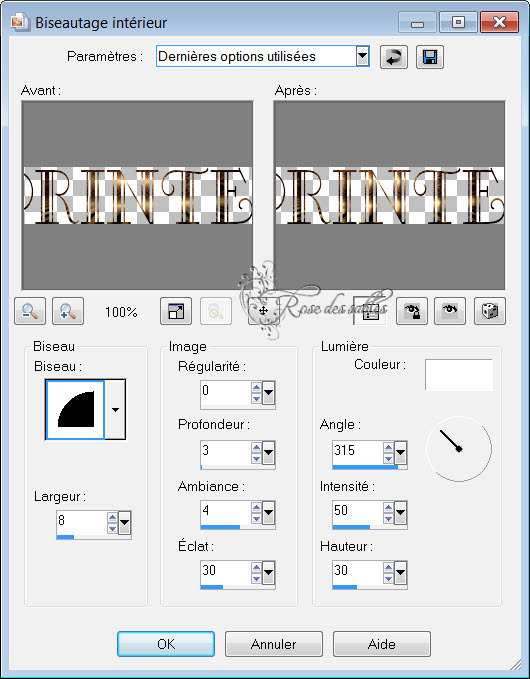
22/Open picture 211/paste into Sélection/ Effet 3D Inner bevel :
23/Désélect/rename this layer PRINTEMPS
24/Copy and paste as new layer tube e523b201 XL/resiez 2 times at 80%
Move it up just above layer FRACTAL
25/Add new layer/Sélection/charge sélection from canal Alpha/choose Sélection Promote selection to layer
Paste again picture 211 into Sélection/Désélect
26/Once again/ Glass effect/duplicate 3 times/place on orange flower or else, according your choice and ribbon also
27/Merge layers as many times you did until you have on layer with the stars/rename it Etoile
28/Add new layer/Sélection/charge from canal Alpha/choose Sélection 6
Promote selection to layer, fill it with picture 211/ still in memory
29/Texture effects/ Blinds :

30/Désélect
31/Put Drop shadow :

32/Sign your création/copy the base called fond/paste it as new image
we will need it later
33/Image add border of 2 dark color
34/Image add border of 2 clear Color
35/Image add border of 2 dark color
36/Change background raster as normal raster
37/Adjust/Neat/More neat
38/Image resize at 90% all layers not checked
39/Add a new layer/Sélection/Sélect all/ fill it with your " Fond" /Layer move down/keep selection
40/Effect/AAA Frame/ Texture Frame :

41/Go to raster on top /Sélection/Sélect all/floating/ and selecton Static/ Drop shadow:

Do again drop shadow with V&H négatives values
42/Désélect
43/Image add a border of 2 dark color.
44/Copy ans paste tube DWTUBES /image resize 1x 60% & 2x 80%
Place it at bottom on the left45/Copy ans paste tube de Corinne Vicaire/image resize 1x 60%/ place it on the right at the bottom of tag/Put drop shadow like at point N°31

46/Adjust/Neat/Neat
47/Merged all layers
Export as JPG
I hope you enjoy my tutorial and
Thank you for doing it
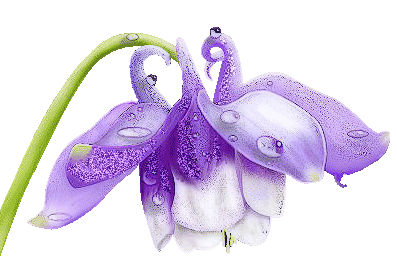
Rose des Sables

My version
Flower tube found on the web
Woman tube Gabry which I thank

-
KARINA DREAMS
From
C.JOSY CREATIONS

MATERIAL
Narah mask 0158
Tube from Karina Dreams
Tube et Preset from Josy
Click on flower to download material
PLUGINS
Simple
AAA frames
Eye Candy 5 impact
Mura Meister
AFS import
You can help yoou with this arrow
to follow tutorial

*********************
1/ open all layers; duplicate and close originals
click 2 times on the preset Josy it will be installed itself
2/ Open a layer of 900 x 600
3/ Foreground color a11d3c , background color b9b6bd
4/ Make a gradient
linear/corner 50/ repeats 1
Fill up layer

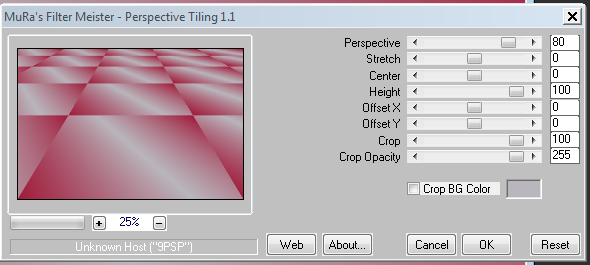
5/ Plugin Mura Meister / persperctive tilling
6/ Pluging AFS import /sqborder

7/ Plugin simple / Top bottom wrap
/

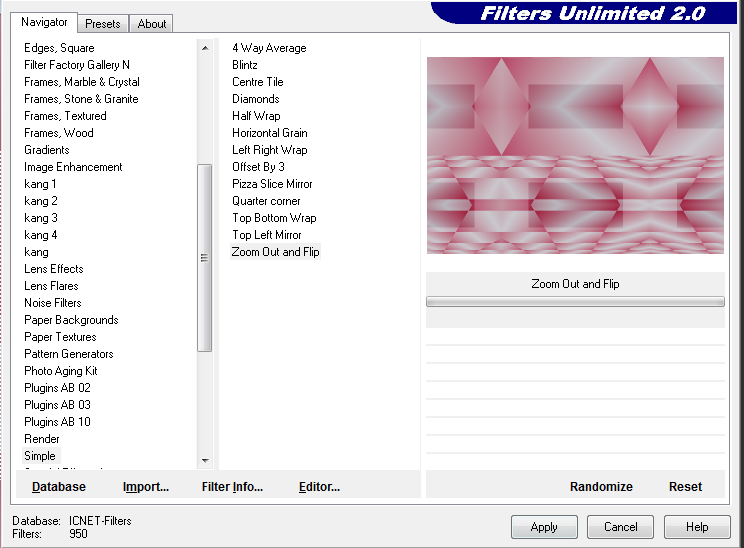
8/ Plugin simple/ zoom out and flip
9/ copy and paste landscape tube as nex layer
Tube Karina Dreams Misted space art..
10/ Put it on top of tag
11/ selection, charged selection from disk
Cjosy karine1

12/ selection, promote selection as new layer
13/ Eye Candy 5 impact/ perspective shadow
Preset C Josy zen

14/ Eye Candy 5/ glass
C josykarine
15/ Deselect all
16/ go back on raster 1
17/ selection, charge selection from disk
C josy Karine2
18/ Plugin Mura Meister/Perspective tilling

19/ Deslect all
20/ copy and paste landscape as new layer
C Josy 454
21/ selection tool

22/ cancel selection tool
23/ Merged all layers
24/ Add new layer
25/ Fill it with white colour
26/ Add new layer of mask from picture
Narah Mask 158

27/ layes/ Merged group
28/ opacity/ soft light
29/ Edges borders, accentuate
30/ copy and paste as new layer woman tube
karina Dreams Red Lady
31/ resize to 80 %
32/ Plugin Eye Candy 5/ perspective Lady
Preset C josy zen

33/ Image add border 2 px foreground
34/ image add border 50 px white color
35/ image add border 2 px Foreground color
36/ With magic wand select white border
37/ Fill up with gradient
38/ Plugin AFS Import /sqborder

39/ AAA frame / Foto Frame

40/ select/ select all
41/ selection / modify/ contract 54
42/ Eye Candy 5 impact/ Perspective shadow
Preset C josyzen

43/ selection / invert
44/ Eye Candy 5 / perspective shadow
C josyzen
45/ selection/ deselect a
46/ Add new layer
47/ Take bruh tool " Dream" click 2 times on it
a mettre ..

48/ Adjust/ Neat /Neat
48/ Eye Candy 5 / perspective shadow
Preset C josyzen

50/ Merged all
51/ resize to 900 px
52/ Add new layer, and sign
I thank you for following my tutorial and
I hope you enjoy it
C. Josy
******
My version
Tube landscape karina Dreams and C.Josy
Tube woman Ketwomen

-
ALF
from MARIA JOSE PRADO
BUTTERFLY

Link on image
MATERIAL
Un tube misted paysage (personnel)
Un tube personnage ou autre ici ( Maelledreams et Malacka )
Un tube decoratif (Crealine et Gabry)That I thank
Colors used for this tutorial
Foreground #322e26 dark color
Background #8a8a8a clear color
Matérial to download by click on flower
You can help yourself
to follow tutorial with this arrow
PLUGINS
Alf's Border X
L en K's
Simple
Graphic Plus
CPK Designs
Eye Candy 5, Impact
AAAFrames
FM Tools
Carolaine & Sensibility**********************
1.- Make a gradient with your 2 colors choosen from tube or else
Dark color at Foreground, clear one at on background
2.- Open in material alpha_alf,
fill it up with your gradient
3.- Plugin Alf's Border X - Border Fade II
(2, 25, 1, 129)

4.- Plugin Alf's Border X - Mirror Bevel - Default (128, 64)
5.- Selections - Load Selection from alpha channel - selection #1
6.- Selections - Promote Selection to Layer
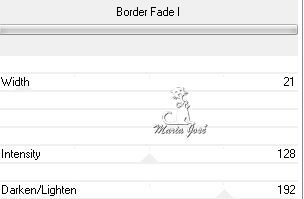
7.- Plugin Alf's Border X - Border Fade I -
(21, 128, 192)
Deselect all
8.- Effects - Image Effects - Seamless Tiling ( see capture for values)

9.- Layers - Duplicate -
Adjust Blur - Radial Blur (see capture)
10.- Effects - Image Effects - Seamless Tiling (see capture)
11.- Plugin - L en K's - Raisa

12.- Layer - Duplicate - Image Free Rotate - Right 90 - All layers not checked

13.- Plugin Simple - Half Wrap
14.- Plugin Graphic Plus - Vertical Mirror

15.- Effects - Reflections Effects - Rotating Mirror (180)
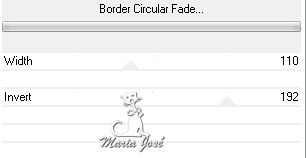
16.- Plugin Alf's Border X - Border Circular Fade (110, 192)
17.- Selections
- Load Selection from alpha channel - selection #2
- suppress or delete -
deselect all
18.- Effects - Drop Shadow 0, 0, 60, 30, black
19.- Activate Promoted Selection (2ª from bottom to top)
20.- Layers - Arrange - Move up
21.- Image - Resize 34% - All layers not checked
22.- Selections -
Load Selection from alpha channel - selection #3
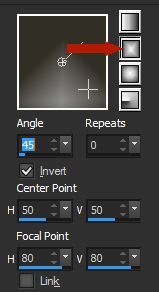
Plugin CPK Designs - Glass Default (19, 46)
Eye Candy 5, Impact - Glass - preset alf_mj
23.- Selections - Selection All - Selections Float - Selection Defloat
24.- Plugin AAA Frames - Foto Frame
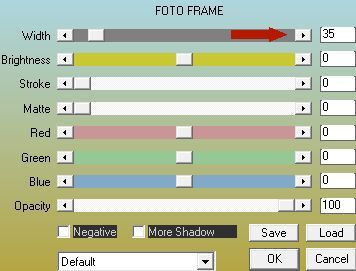
Repeat AAA Frames

25.- Deselect all -
Image - Free Rotation - same configurations as above
26.- Image - Image Effects - Offset

27.- Effects - Reflections Effects - Rotating Mirror, same configurations above
28.- Copy and paste as new layer - alf_deco
29.- Image - Image Effects - Offset

30.- Layer - Merge Down -
put Blend Luminance (L) or else adapted to your choosen colors
Drop Shadow 0, 0, 60, 30 black color
31.- Effects - Image Effects - Offset

32.- Activate Copy of Promoted selection (2ª from bottom to top)
Effects - Reflections Effects - Rotating Mirror - same configurations as above
33.- On raster 1 - Plugin L en K's - Zitah (see capture for values)

Plugin FM Tools - Blend Emboss - Default
34.- On this same layer - Selections
Load Selection from alpha channel - selection #4
Promote selection to layer - Arrange - Move Up 2 times
Plugin - Carolaine & Sensibility - CS_LDots

Copy and paste your misted tube, landscape or else as new layer
Image - Resize if needed - Ajust to your taste
Selection - Invert - suppress or delete - Selection Invert again
Put opacity between 60 e 75% (here 75%)
Layer - Merge Down - Drop Shadow 0, 0, 60, 30, black
Deselect all
35.- Close visibility of Promoted Selection (the one on top)
at that time look for position of your layers
Activate any inferior layer and merge all visible layers

36.- Layer - Duplicate - Effects - Geometric Effects
Perspective Vertical (-50) transparent
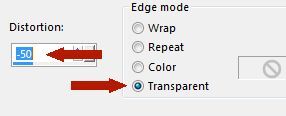
Take selection tool, arrow, and display scale
procede like the capture abaixo (Tecle letra M)
put down your layer to 440 px

37.- Effects - Geometrique Effects - Spherize -
Drop Shadow 0, 0, 60, 30, black

Copy and paste deco spectrum as new layer
38.- Open visibility of your layer promoted selection
and merge all visible layers

39.- Image - Add Borders - 1px dark color
Image - Add Borders - 5px clear color
Image - Add Borders - 1px dark color
40.- Selections - Select All - Edit copy
41.- Image - Add Borders - 50px white color
Selections - Invert - past into selection your copied image kept in memory
42.- Plugin - Graphic Plus - Vertical Mirror Default (128, 0)
43.- Plugin FM Tools - Blend Emboss - Defaut
44.- Selections - Invert - Drop Shadow 0, 0, 80, 40, black
45.- Deselect all - Copy and paste your tubes , lady or else,and decorativ ones
- Drop Shadow on your choice
46.- Image - Add Borders 1px dark color
47.- Image - Resize 900px Width -
Sign your création and save as jpg
I thank you for having followed my tutorial
ans I hope you liked it
Maria José

My version
Lady tube by Mina
Fower tube by Tatie
Landscape tube by Guismo
that I thank

-

FRANIE
BY MARIA JOSE PRADO
( BUTTERFLY )

( Link on image )
MATERIAL
click on flower to download
Un tube of woman or other
( Here,Karine Dreams et Grisi ) that I thanks
1 décoratif tube, flower or other
(ici,Thafs e Maxyran) that I thank
Colors used in this tutorial
Foreground #56493f dark color
Background #d0c1a9 light color
FILTERS
VMDistortion
Mehdi
VM Experimental
Transparency
Carolaine & Sensibility
Simple
FMTools
AAAFrames
Geometric Effects
Eye Candy 5, ImpactHelp yourself with this arrow to follow this Tut

1.- Prepare rectangular gradient
Foreground dark color - Background light color
2.- Open a clear layer 900x600px, fill up with gradient
3.- Filter VMDistortion, Radiator II, défault

4.- Filter Mehdi, Weaver, Size 350

5.- Layer duplicate
FilterVM Experimental Guess What

6.- Filter Transparency, Eliminate Black
7.- Change the blend mode for " screen"
8.- Filter Carolaine & Sensibility, cs_texture, défault
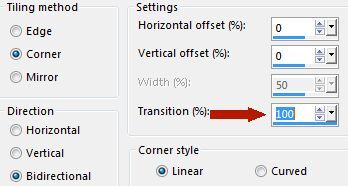
9.- Effects, Image effects, seamless tiling
corner, Horizontal, Transition to 100

10.- Filter Simple, Pizza Slice Mirror
11.- Filtre, FM tile Tools, Blend Emboss, défault
12.- On same layer - Sélection, Charge sélection form disk franie_mj
13.- Sélection, Promote selection to layer
14.- Plugin AAA Frames, Foto Frame

Drop shadow 0, 0, 50, 20, black color
15.- Sélection, Modify, contract to 10
Répeat drop shadow
16.- Copy your tube, here, Karina Dreams pretty face
and paste it as new layer
ajust it to center and resize it , if you need
17.- Inverse selection- click on suppress button ( delete ) -
Inverse selection again
Duplicate layer
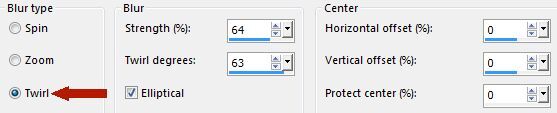
Adjust , blur, radial blur
Twirl , elliptical , as on capture

Filter Carolaine & Sensibility, CS_LDots, défault

Adjust sharpness, more sharpness
Layer move down
Layer - Activate supérior layer- Merge down
layer move down- Activate supérior layer- Merge down
Deselecte all- Drop shadow 0, 0, 50, 20, black color
18.- Close visibility layer of tube
and merge all others layers
19.- Duplicate layer - Effects - géométric effects
Perspective Vertical (-50) Transparent
20.- Take selection tool , the arrow or click on letter K
install l script- preset_majo _1
( which is in matérial )
if you dont kow I explain
You can install it in your default parameters of your psp click on arrow then of selection tool give it a name ans click on name it will open it directly
and deselect by click on M
21.- Effects, Drop shadow 0, 0, 50, 20, black color
22.- Give visibility to your tube
Frame it well
23.- Plugin Eye Candy 5, Impact, Perspective Shadow - Preset shadow_mariajose
24.- Merge all visible - Add new layer
Fill it up with you light color- Opacity to 80%
25.- Add a new mask layer from image - mask_franie -
Merge group
26.- Edge Effects, accentuate, or accentuate more
depends on your colors
27.- Effects, Drop shadow 5, 5, 50, 5, black color

28.- Put blend mode of layer in " sreen mode" -
adjust opacity according the choosen colors
29.- Copy and paste décorativ tube, ici
Maxyran 05 11 deco ( vase ) like on model
- Repeat Eye Candy 5 - Perspective Shadow
(if needed adjust height of your shadow)
30.- Copy and paste as new layer - deco_franie_mj
Effects, image effects, offset

31.- Image , add a border of 1px your dark color
32.- Image , add a border of3px your light claire
33.- Image , add a border of 1px your dark color
34.- Sélection - Select all - Édit copy
35.- Image , ajust a border of 40px white color
36.- Inverse selection - paste into it your copied image
37.- Filter, Simple, Pizza Slice Mirror
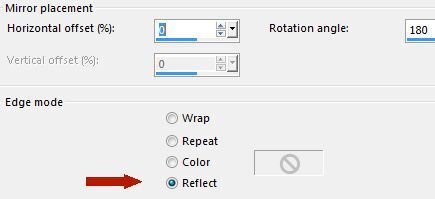
38.- Effects, Réflexion Effects - Rotating Mirror

39.- Inverse selection - Drop shadow 0, 0, 60, 30, black color
40.- Deselect all - Copy and paste the text tube franie
colorize in your colors
41.- Resize your image to 900px width largeur -
Sign et register your creation in JPG
I hope you liked this tutorial
and I thank you to have done it
Maria José
Ma version
Tube femme de Mica
Tube fleur de Karina Dreams
que je remercie

-
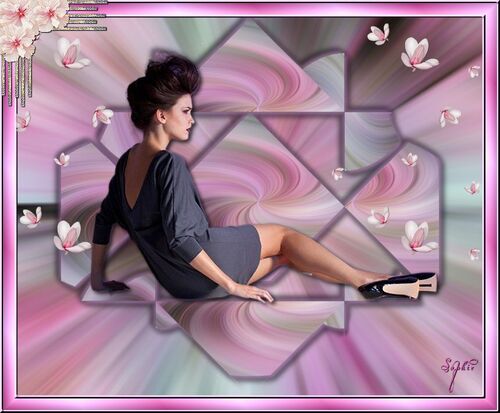
MORGANE
FROM JOANNE
If you want to present her tutorials on your forums or sites please ask her first. If you publish your creation on a site or a blog please put a link towards the tutorial. Thank you to understand and respect the rules.
*********
The tubes Joanne uses have been sent by the authors on different groups
And she has their permission to use them
Some of them have been found on the WEB,
If you see a tube that belongs to you, contact Joanne or myself
And a link towards your site will be added.**********

Link of Joanne Site on création
**********
FILTERS
Flaming Pear / Flexify 2
Graphic Plus , EmbossMATERIAL
You can help you with this arrow
1/ place selection in you selection file
2/ place your gradient in your gradient file
3/ Prepare your gradient with this configuration
4/ Open a transparent raster 800 x 600, select, select all
5/ copy your landscape tube,and paste into selection
6/ call this raster "Landscape" and close it
7/ add a new layer,put the gradient you have prepared in it
8/ raster, new raster of mask from image
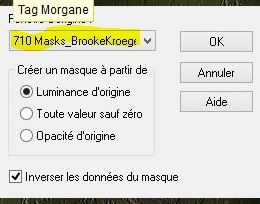
select 710 masks Brook...
9/ Merge all layers
10/ layer duplicate, image flip Horizontal
11/ Merge visible layers
12/ layer, diplicate, merge all, call this raster " cadre 1"
13/ duplicate layer, stay on copy and close raster "cadre 1"
14/ Effects, distorsion effects,Polar coordinates

15/ Plugin flaming Pear, Flexify 2

16/ Effects, image effects
17/ Duplicate layer, merge down
18/ Duplicate layer,Image flip vertical, merge down
and call it " cadre 2"
19/ Charged selection from disk

20/ press delete, all deselected
21/ Open raster called " cadre 1"
22/ layer duplicate,merge all visible layers
23/ Adjust, clearness, clearness
24/ Plugin graphic plus, emboss, all numbers at zero
25/ Drop shadow 3/3/100/10 black color
26 /do it again with negative -3/-3/100/10/ black color
27/ go on raster " landscape", open it
28/ copy and paste your tube
29/ resize image at 60%, all layers not clicked
30/ place this tube as on the model
31/ adjust , clearness, clearness
32/ same Drop shadow than at point 25
33/ go to raster on top of pile
34/ copy and paste my watermark given in material
35/ sign your creation
36/ Merge all layers
37/ add a bordure 2px of black
add a bordure 30 px of white
add a bordure 2 px of black
38/ With Magic Wand select white border
39 / and paint it wih your dark color
40/ filtre graphic plus, crossed shadow , défault
41/ one more time
42/ reverse selection
43/ drop shadow of points 25 and 26, deselect
44/ register as a JPG
Thank you for having done my tutorial
hope you enjoy it
Joanne
Thanks to Roby2764 for the beautiful tube
and Brookekrogerdesigns for the mask
Thanks for the author of the Landscape ,
I unfortunately don't jnow his name
*******
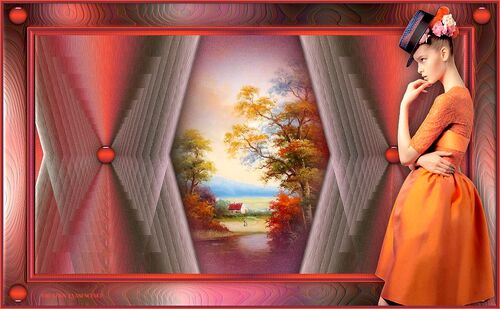
My version
Tube of Azalée Thank you

-
SUAVIDADE
DE
ANNA NETTO

Lien sur image
MATERIEL
Tube de paysage ou image et tube personnage
décorations à votre gout
( personnellement j ai pris une image )
pour ce tutoriel j ai utilisé les tubes de
DBK AUTUMN-2
lady--gold_lizztish
Gina
deko1-FILTRES
Alf's Boder FX ( Gear / BoderdafeI )
Flaming Pear / Flexify 2
Effets de PSP***************
01 Ouvrir votre Psp
02 Ouvrir votre tube paysage
03. Choisir deux couleurs:
une sombre en AVPL et une sombre en ARPL
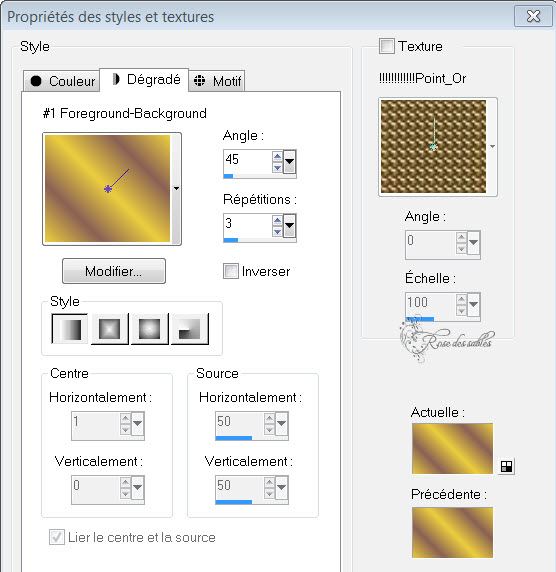
04. Faire un dégradé linéaire: angle 0 / Repétition 1 / inversé décliqué
05. Edition / Copier votre tube ou image
06. ne pas redimensionner
07. Ouvrir un calque transparent de 800 X 650px.
08. Remplir cette image avec le dégradé
09. Sélections / Tout sélectionner
10. Edition / Coller dans votre Sélection
11. Désélectionner
12. Effets / Effets d 'image / mosaïque sans jointures/par défaut
13. Flou Radial configuration: Zoom / 60 / Eliptique cliqué / 4 / -5 / 0

14. Calque dupliqué
15. Selection / Tout sélectionner
16. Edition / coller votre image paysage dans la sélection à nouveau
17. Tout Désélectionner
18. Effets / Image Effets d'image / mosaïque sans jointures/ Default
19. Faire un flou radial avec ces configurations Torsion / 60 / 40 / Elliptique cliqué / 4 / -5 / 0

20. Effets / Filtre personnalisé/ Emboss 3 / par défaut
21. Appliquer le filtre Alf's BOrder FX / Gear... 5 / 255 / 255 / 255 161 / 128

22. Activer la baguette magique
23. Selection la partie blanche
24. Supprimer
25. Déselectionner
26. Appliquer le filtre Flaming Pear / Flexify 2

27. Avec la gomme supprimer les 4 coins disgracieux
qui apparaissent comme sur la photo , et des petits traits qui peuvent
apparaitre et être disgracieux, la rosace doit etre parfaite

28. Effets / 3D Effets / Ombre portée 4 / 4 / 80 / 10 / couleur claire
29. Effets / 3D Effets / Ombre portée -4 / -4 / 80 / 10 / couleur claire
30. Effets / 3D Effets / Ombre portée 4 / 4 / 80 / 10 / couleur noire
31. Effets / 3D Effets / Ombre portée-4 / -4 / 80 / 10 / couleur noire
32. Fusionner les calques visibles
33. Image / ajouter une bordure de 5 px. / couleur contrastante
34. Avec la baguette magique, la sélectionner et la remplir de la couleur claire
35. Effets / 3D Effets / Biseautage intérieur/ figure 2 , bombée, valeurs par défaut
36. Désélectionner
37. Image / Ajouter une bordure de 20 px couleur contrastante
38. La sélectionner avec la baguette magique
39. Remplir avec le dégradé utilisé précédemment, avec ces configurations
Dégradé Linéaire Angle 45 / Répétitions 10 / Inversé Décoché
40. Appliquer le filtre Alf's Border FX / BorderFadeI

41. Déselectionner
42. Image / Ajouter une bordure de 5 px, couleur contrastante
43. Avec la baguette magique, la sélectionner, et la remplir de la couleur claire
44. Effets / 3D Effets / Biseautage intérieur / figure 2 , bombée, par défaut
45. Tout désélectionner
46. Coller votre tube principal
47. Effets / 3D Effets / Ombre portée a votre gout
48. Décorer a votre gout
49. Fusionner tous les calques
50. Signez votre travail
51. enregistrer jpg
Merci d 'avoir suivi mon Tutoriel
j’espère qu'il vous aura plu
*********
Ma version
tube femme de LB
decos fleurs et coins du net
-
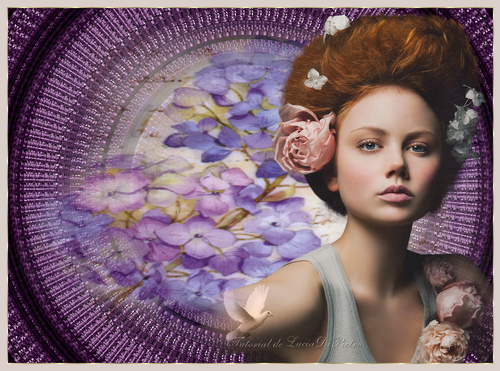
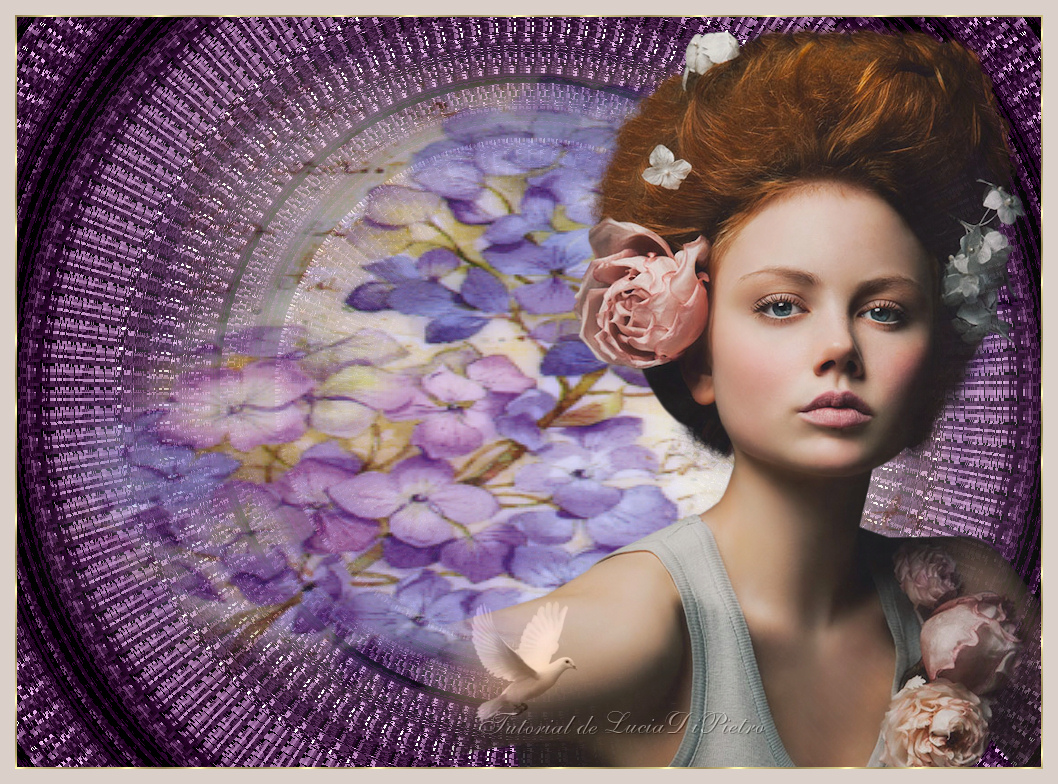
A VIDA E BELA
DE LUCIA DU PIETRO
*********
MATERIEL
Un tube mist principal
Un tube mist de fleur ou de paysage
la marque du créateur est dans ce tutoriel ( watermark )
Matériel ici, cliquez sur la fleur
FILTRES
Plugin Deformation > Voltex ( do Unlimited 2)
Plugin > VM Instant Art > Round and Round ( do Unlimited 2)
*******************
1 - ouvrir un calque transparent de 1440x900pxet le remplir avec la couleur #502850
2 - Appliquer le filtre Krustv's FX vol II 1.1 , spécial édition Gerator R ( Spider)
Valeurs suivantes 71/174/2 /162/131/164

3 - Appliquer le filtre de Déformation > Vortex
vous l 'avez dans unlimited2 ou à part
valeurs 255/ 100

4 - Dupliquer le calque et le redimensionné à 80%
( décliquez tous les calques en redimensionnant )
5 - Appliquer sur la copie du calque 1 le filtre > VM Instant Art > Round and Round
valeurs 39/221/158.

6 - Réglages, traitement optimal des photos avec les valeurs ci dessous

7 - restez sur la copie du calque 1 , ouvrir vos tubes Mists ( By Roxanne ) fleur ou paysage, et placer selon votre gout au centre de votre travail comme nouveau calque
8 - Activer votre tube principal, femme ou autre ( ici le tube utilisé est de Mary et Edit )
et coller comme nouveau calque
placez les tubes comme sur le modèle
9 - Pour donner plus de luminosité a votre travail sans endommagé votre tube principal, activer le calque 2 ( le calque en dessous du tube principal
et appliquer Réglages, Luminosité et Contraste - 12 /24.

10 - Fusionner tous les calques
11 - Effets > Effets 3D > Ombre portée

12 - Image > ajouter une bordure de 2px, symétrique coché

13 - Sélection votre bordure de 2 px avec la baguette magique, et remplir avec une texture dorée ou autre à votre goût
14 - Ajouter une bordure de 15px, Symétrique coché avec la couleur #e5dcda ou une autre a votre goût pour votre création
15 - Répéter la même ombre portée qu'au numéro 11
16 - Signer votre travail et merci de ne pas oublier de mettre mon watermark qui est dans le matériel où vous le souhaiter sur la création
J’espère que vous avez pris du plaisir à réaliser ce tutoriel
Merci de Lucia di Pietro
*******
Ma version
Tube femme perso
Tube fleur rêverie

-


Mes groupes de partage


Sites pour tubes
Gabry (Tube e mist Gabry)
Guismo (chez Dakara)
Jeanne tube designs (JVDE)
Plaisir de tuber (Françoise)
-
-

Je vous souhaite la bienvenue sur ce blog
qui est dédié à la passion du graphisme
Ici vous trouverez des traductions, sous
autorisation, de tutoriels étrangers.
Je vous souhaite beaucoup de plaisir
dans vos créations autant que j en ai eu
à les traduire pour vous
Je vous remercie de votre visite
Évanescence

-
Pour accéder aux tutos des créateurs
cliquez sur le cœur
en dessous de leurs
bannières

-

Derniers Articles
-

Lumières d' Automne
-


-


-


-


-


-


-

-

-


-


-


-


-


-


-

-

cliquez sur le logo au dessus site amis pour ouvrir la page
-

-

-


-


Pour mettre mes bannières
sur votre site ,cliquez sur l'une d'elles vous aurez les codes pour les incorporer
To put my banner on your site, just click on anyone of the two you have and you will have the codes on the opening page
-
-

-
Allez visiter le site de Rénée Graphisme pour vos filtres et plein d'autres choses encore
-
Livre d' Or


