


-
Par Evanescence* le 19 Mai 2015 à 22:36
Hanny
de Maria José Prado
Butterfly
( link on image )
MATERIAL
click on flower to dowload

1 tube principal (Grisi)
1 misted (Landscape or else)
1tube decoratif (DBK)I thank them
colors used for this tutorialForeground #fff1f2 - Background #b19997
PLUGINS
Mehdi
Graphic Plus
Eye Candy 5, Impact
Simple
MurA's Meister
L en K'sHelp you with this arrow for this tutorial

1.- Choose 2 colors of your tube
Foreground clear color, Background color
2.- Open a transparent layer de 900x600px
Plugin Mehdi, Wavy Lab 1.1

Plugin Mehdi Edges FX

Effects , border effects enhance more
3.- Plugin Graphic Plus, Pin Wheel 5, 0, 7

4.- Sélection,
charge sélection depuis le disque " sel_mariajose_mj "
Promote Sélection to layer
Drop shadow 0, 0, 60, 30 black color
Désélect,
duplicate layer, Image resize 90%
(all layers not checked)
Duplicate again layer,
Image resize at 90% (all layers not checked)Merged down 2 times deux fois
5.- Selection, charge Selection from disk
" sel_1_mariajose_mj"
Filter Eye Candy 5, Impact,
put preset mariajose_hanny_glass
Repeat drop shadow, all deselect
6.- Effects, images effects,seamless tiling
angle, H 65, Transition 0
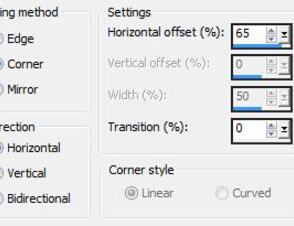
Repeat avec H (-65), transition 0

image resize at 70%, all layers not checked
7.- Plugin Simple, Left Right Wrap
8.- Layer, add a new layer, fill it with white color
9.- Layer, new layer of mask ,take in matérial, mask_marijo

Effects Border,enhance, merge group
Texture Effects, Canvas , dark color

Mode of layer put on screen or else, up to you
dépends to your choosen colors
10.- Activate le Raster 1
Sélection, charge Sélection from disk, sel_2_mariajose_mj
Promote selection to layer
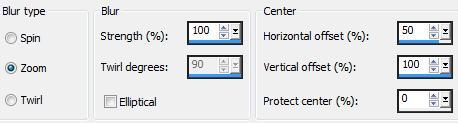
Adjust blur, radial blur
Sélection, Modify, Sélect inside borders of selection
intérieur, anti alias border at 3

Effects, border effects, enhance, Désélect all
11.- Again Charge sélection from disk sel_2_mariajose_mj
Sélection, Modify, Contract of 5px
Copy and paste as new layer your misted, landscape or else
Inverse selection, suppress or delete,
Inverse again
Drop shadow 0, 0, 60, 30, black color
Deselect all, merge down with the one under
12.- Copy and paste extrude_1_mj,
Image Effects, offset

Put this layer on top of the pile
13.- Activate Raster 1
Selection, charge Selection from disk sel_3_mariajose_mj
Promote selection to layer
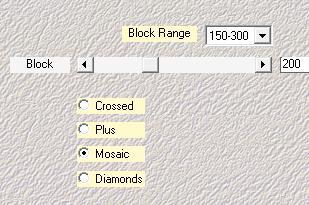
Plugin Mehdi, Sorting Tiles
Plugin MurA's Meister, Perspective Tiling, défault values
Deselect all, drop shadow, same values that above
14.- Activate Raster 1, Plugin L en K's Zitah

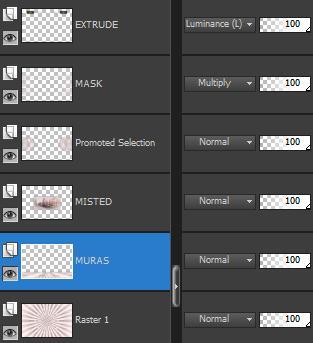
You should see layers like this at this time
15.- Image, add a border 1px, dark color
Change your background layer as raster, Duplicate
Image, Resize at 85%, all layers not checked
16.- Selection, Select all, Floating selection, then static Selection
Merged all visible layers, inverse selection
17.- adjust, Radial Blur like above
Repeat filter L en K's Zitah, same values like above
Inverse selection, Repeat drop shadow
désélectionner all
18.- Image, add a border of 1px, dark color
Image, add a border of 50px, white color
19.- Sélect this border with magic wand
Inverse selection, Repeat drop shadow
Inverse selection, Repeat radial blur
Promote selection to layer, Inverse selection
Repeat drop shadow
déselect all
Plugin MurA's Meister, Perspective Tiling

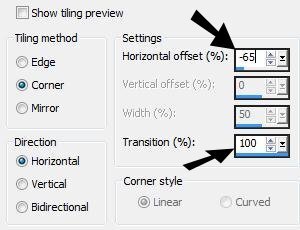
20.- Image effects, seamless tiling
Angle, Horizontal -65, transition 100
21.- Plugin Graphic Plus, Horizontal Mirror

22.- Layer Duplicate, flip vertical
merge down with under layer
Drop shadow 0, 0, 60, 30, black colour
border effects, enhance
23.- Activate again raster 1, Selection, Select all
Selection, Modify, contract to 50, Repeat drop shadow
24.- Désélect all, merge all layers
25.- Copy ans paste your principal tube, woman or else
Drop shadow as you like on tube
26.- Image, Add a border of 1px, dark color
27.- Image, Resize your tag at 900px width,
sign it and register
J’espère que ce tutoriel vous aura plu
Maria José

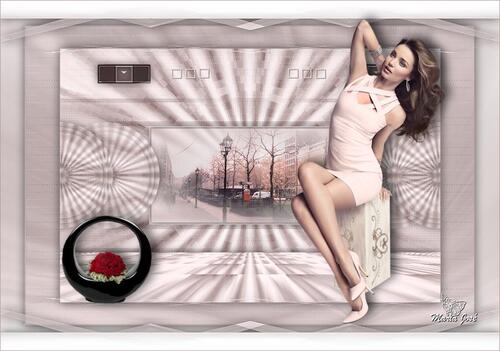
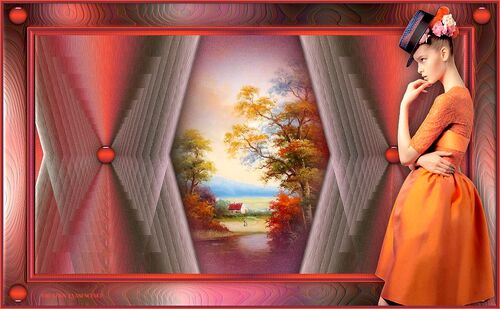
Ma version
Tube paysage Corinne Vicaire
Tube femme perso
merci aux tubeurs

-
Pour accéder aux tutos des créateurs
cliquez sur le cœur
en dessous de leurs
bannières

-

Derniers Articles
-

Lumières d' Automne
-


-


-


-


-


-


-

-

-


-


-


-


-


-


-

-

cliquez sur le logo au dessus site amis pour ouvrir la page
-

-

-


-


Pour mettre mes bannières
sur votre site ,cliquez sur l'une d'elles vous aurez les codes pour les incorporer
To put my banner on your site, just click on anyone of the two you have and you will have the codes on the opening page
-
-

-
Allez visiter le site de Rénée Graphisme pour vos filtres et plein d'autres choses encore
-
Livre d' Or


