


-
Par Evanescence* le 16 Mars 2016 à 21:44

Link on tag
This tutorial is property of Feline C31
Its traduction is property of Evanescence

MATERIAL
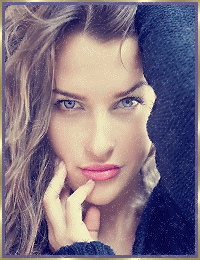
Thanks to Azalée for her nice tube

FILTERS
Eyes Impact 5 / Backlight

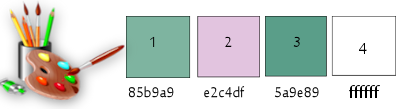
Colors used for this tutorial
1-Open a transparent layer of 900/550 px
2-Sélect all
3-Open flower background
4-Copy it in selection
5-deselect, keep it on your corel board
you'll need it later
6-Effect / image effect, seamless tiling
corner
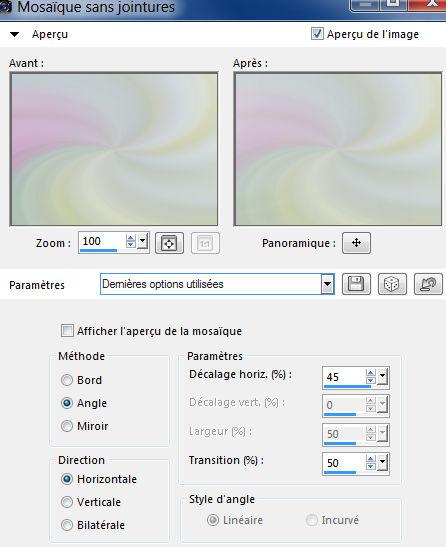
7- Adjust, blur, radial blur
twirl

8-new layer , will be layer 2
9-fill with color 1
10-Open mask Linda psp
11-layer, new layer of mask from image

12-Effect , edge effect, accentuate
13-Merge group
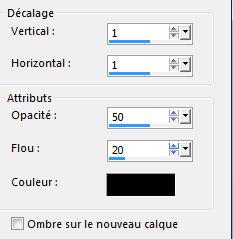
14-drop shadow 1/1/30/1 black

15-Merge down
16-Tool sélection

17-personnal sélection


18-transform selection as layer ( transformed selection)
19-Duplicate (Copy of transformed selection )
20-stay on this layer
21-Sélection/ Modify /contract of 25
22-Fill it with color 2
23-Sélection/Modify / contract again of 25
24-Paste flower background into selection
25- Layer new layer 3
26-Effect 3D/ cut
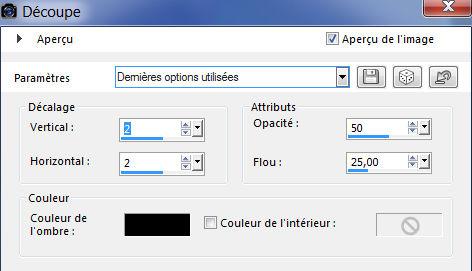
27-Capture 2/2/ 50/25 black
28-Merged down
29-select none
30-Select with magic wand the pink frame
31-Effect 3D/ Inner bewel

32-select none
drop shadow 1/1/50/20 black
33-Resize at 85%
all layers not clicked
34-go to layer transformed selection
35 Adjust, add noise at 30 uniform

36-layer new layer (raster 2)
37-Sélection tool, personnal selection
same values as in point 17
38-Sélection / Modify / extend of 1
39-Put white color in it
40-Sélection /Contract of 2
41- suppress or
 on keyboard
42-Effect Eyes Candy impact5/ Backlight
take preset in material
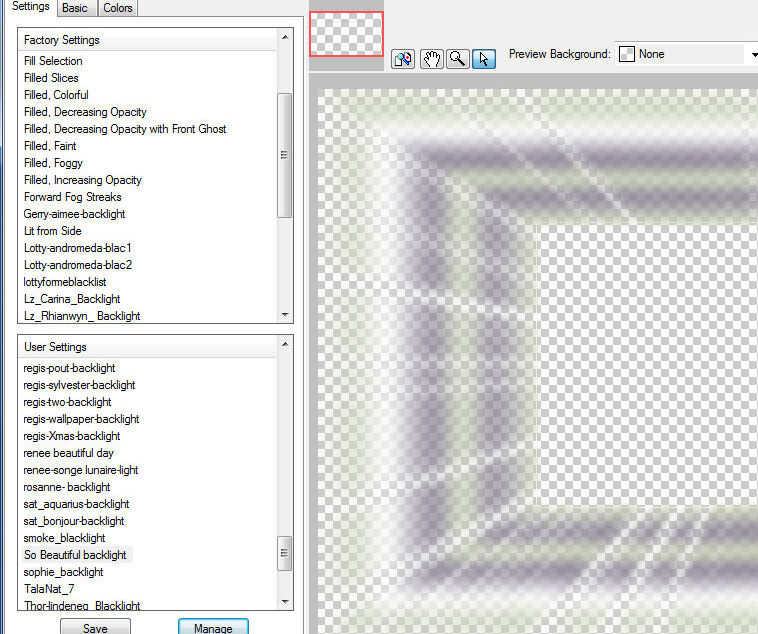
43-if preset does not work or you don't know
here find manual values

44- Blend mode of layer on overlay opacity at 100
45-Effect drop shadow /1/1/30/10 black color

46-go on raster 1
47-Sélection / Charge selection So beautiful from disk
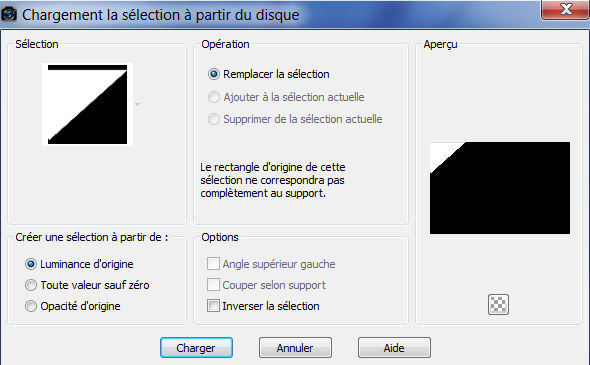
48-Transform selection into layer
49-Effect/ texture effect, blinds color 3

50-Adjust, sharpness, sharpness
51-Blend mode of layer opacity at 80
52-Sélection/ Modify / contract of 15
53-Drop shadow 1/1/50/20 black color

54-Sélection contract again at 15
55-Drop shadow 1/1/50/20 black
56-deselect
57-Effect, reflection effect/ feedback

58-Drop shadow 1/1/30/20 black

59-duplicate layer
60-Image, inverse, vertical mirror for old versions
61-Stay on this layer
62-Open tube tube déco So Beautiful
63-paste as new layer dont move it
64-Your layers look like this
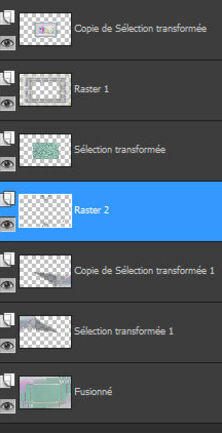
65-Merge all visible layers
66-Add a border 1 white
67-Add a border of 2 color 1
68-Select all
69-Add a border of 25 white
70-Sélection inverse
71, adjust , add noise aléatoire, random value 2
72-Effect 3D cut

73-deselect
74-Add a border of 1 color 1
75-Sélect all
76-Add a border of 40 white color
77-Sélection inverse
78-Effect 3D , cut, same values than in point 72
79-Open tube texte So beautiful
80-paste as new layer, don't move
81-Open déco 2 Eyelets
82-paste as new layer
selection tool

83-Position Horiz 626 Vert 440

84- Mode of blend Luminance L at 100
85-Duplicate
86-Image / horizontal mirror
87-Tool selection
88-Position Horiz 674 Vert 85

89-Open tube femme de Azalee or yours
90- paste as new layer
91-Resize at 80 %
92-Tool sélection
93-Position Horiz 31 Vert 4

94-drop shadow 5/5/ 40 /30 black color
95- finish with a border of 1 color 1
96-one border of 1 color white
97-Resize at à 900 pixels width
register in jpeg mode
Thank you for doing my Tutorial
Feline
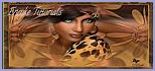
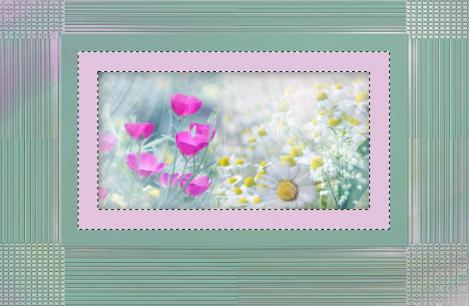
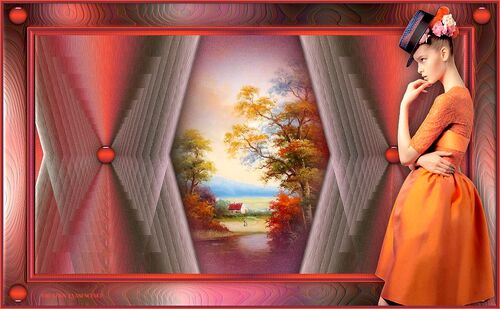
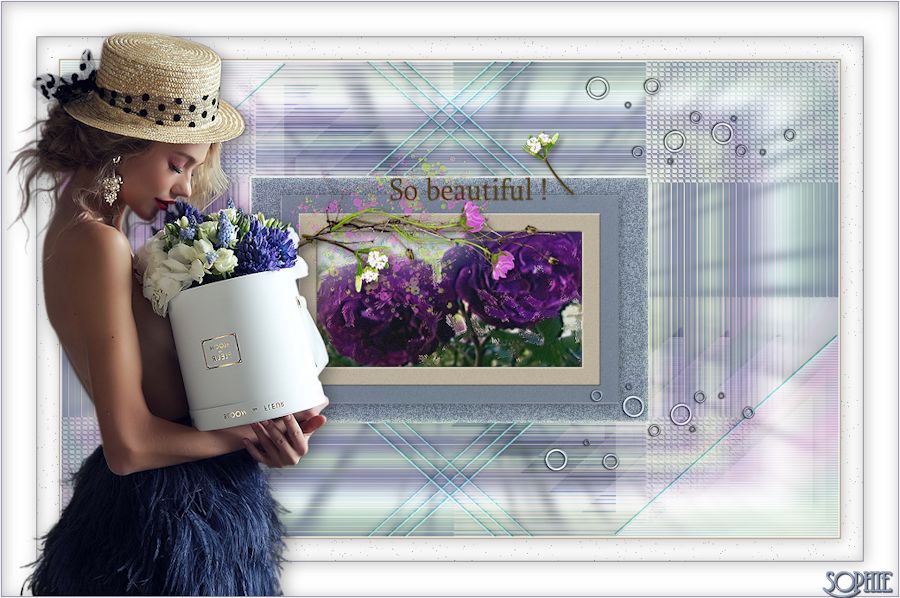
My version
Tube of LB tubes

-
Pour accéder aux tutos des créateurs
cliquez sur le cœur
en dessous de leurs
bannières

-
Derniers Articles
-

Lumières d' Automne
-


-


-


-

-


-


-

-

-


-


-


-


-


-


-

-

cliquez sur le logo au dessus site amis pour ouvrir la page
-

-

-


-


Pour mettre mes bannières
sur votre site ,cliquez sur l'une d'elles vous aurez les codes pour les incorporer
To put my banner on your site, just click on anyone of the two you have and you will have the codes on the opening page
-
-

-
Allez visiter le site de Rénée Graphisme pour vos filtres et plein d'autres choses encore
-
Livre d' Or

