
/image%2F0654964%2F20241204%2Fob_9a5cd9_unnamed.jpg)

SERENITY
BY
MARIA JOSE PRADO
MATERIAL

PLUGINS
Help yourself with this arrow


1.- Prepare a gradient with 2 colors of your tube or others
see configuration

2.- Open a transparent layer - 950x650px -
filli it up with background color ou dark one
3.- Layers - New Mask Layer - chmasks_portrait5
layers - merge group

4.- Plugin - Caroline & Sensibility - CS-LDots - Blend Mode - Screen

5.- Layers - Add New Layer - Fill it with gradient
6.- Plugin Mehdi - Sorting Tiles

7.- Effects - Image Effects - Seamles Tiling

8.- Effects - Edges Effects - Enhance
9.- Plugin - Filter Factory Gallery "M" - Loom

10.- Plugin - Simple - 4 Way Average
11.- Filters Unlimited2 - Paper Texture - Canvas Fine

12.- Layers - Arrange - Move Down
13.- Selections - Load Selection from Disk - serenity_mj
14.- Promote Selection to Layer
15.- Keep selection - Effects - Texture Effects - Mosaic Glass

16.- Deselect all - Plugin - MurA's Meiter - Perspective Tiling

17.- Layers - Duplicate - Image - Flip Vertical - Layers - Merge Down
18.- Put a blend mode of layer for screen or other
19.- Copy and paste newdecoabstrat - as new layer
20.- Activate Raster 1 - Selection - Load Selection From Disk serenity_1_mj
21.- Transform selection into Layer - Layers - Move Up
22.- Adjust - Blur - Gaussian Blur - Radius at 50
23.- Copy and paste as new layer - your principal tube
24.- Adjust- Selections - Invert -
cancel or suppress on keyboard - Selection Inverse
25.- Layers - Merge Down - Drop Shadow 1, 1, 100, 1, black color
Repeat in negative values (-1), (-1)
26.- Deselect all - Layers - Duplicate - Layers - Move Down
27.- Effects - Image Effects - Seamless Tiling - Horizontal

28.- Effects - Reflection Effects - Rotating Mirror - (180 ou 0) depends on your image

29.- Activate layer on top (promoted Selection)
30.- Image Resize - 95% - All Layers not checked
31.- Activate Raster 1 -
Copy and paste your Misted tube landscape as new layer
32.- Put opacity of layer between 70 and 80% - your choice
33.- Copy and paste as new layer - deco_1
34.- Layers - Arrange - Bring To Top
35.- Effects - Image Effects - Offset

36.- Copy and pste as newl ayer - deco_2
37.- Effects - Image Effects - Offset

Your layers should be like this at moment

38.- Image - Add Borders - 1px - dark color
39.- Image - Add Borders - 5px - clear color
40.- Image - Add Borders - 1px - dark color
41 - EDIT COPY
42.- Image - Add Borders 45px - white color
43.- With Magic Wand Select white border -
paste into this selection of border the image you copied just before
44.- Adjust - Blur - Radial Blur

45.- Selections - Invert - Drop Shadow - 0, 0, 100, 50, dark color (background)

46.- Selections - Modify - Contract 10 - Repeat drop shadow
47.- Selections - Invert - Plugin UnpluggedX - Defocus

48.- Adjust - Sharpness - Sharpen More
49.- Selections - Invert - Drop Shadow - 0, 0, 100, 50, dark color (background)
50.- Selections - Select All - Modify - Contract 10 - Repeat drop shadow
51.- Image - Add Borders - 1px - dark color (background)
52.- Image - Resize - 950px Width
53.- Copy and paste tube of texto like model
Put blend mode of layer for Luminance Legacy L
54.- Layers - Merge All Flatten - Adjust - One Step Noise Removal
55.- Sign your creation and register in jpg mode
Thank for having followed my tutorial
I hope you enjoy it
Maria José
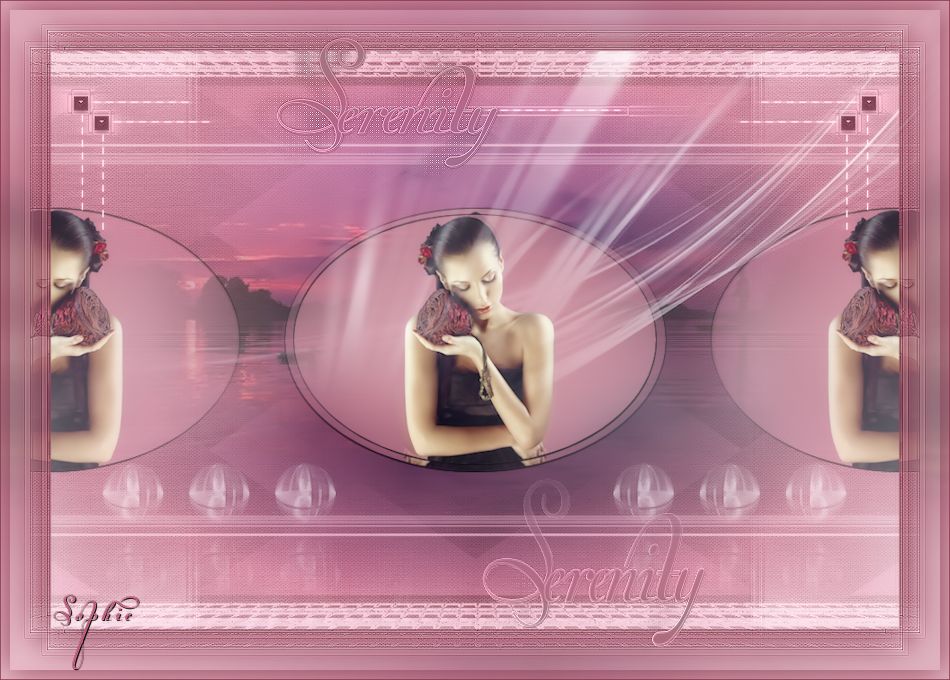
My version
woman tube of Gabry
Landscape tube of Guismo
that I Thank


/https%3A%2F%2Fekladata.com%2FYPI8DwfBf4bU6fHRpkzcSxO2pDU%40500x338.jpg)
/https%3A%2F%2Fekladata.com%2F_hXetnNky_6mWLePzNC4_ZUg_NQ%40500x364.jpg)