
/image%2F0654964%2F20241204%2Fob_9a5cd9_unnamed.jpg)


MATERIAL

Thanks Tocha for beautiful woman tube
to Luz Cristina for landscape tube

FILTERS
Toadies/ Ommadawn
Toadies / What are You ?
Unlimited /Papier Texture/ Fribrous Paper coarses
Eyes impact5/ Perspective Shadow
Put gradient in your file
double clic on preset perspective Abisha shadow,
it will go directly in your file
Colors of this tutorial

1-Open a transparent layer ( Raster1) of 900/550 px
2-Fill with color 1
3-Effect Unlimited / Papier texture/ Fribous paper Coarses

4-Open maske Monaiekje mask 34
5- minimize it
6-Layer new layer ( Raster 2) fill it with color 2
7-New layer of mask from image

8-Merge groupe
9-Effect , edge effect, accentuate
10-Go on rater 1
11- layer, new layer raster 2
12-Put gradient Nature c in foreground
linear 325/0

13-Fill layer with gradient
14-Mode of layer on overlay opacity 100
15-Open landscape tube of Luz Cristina
15B- go on layer on top of pile
16-paste as a new layer
17-selection tool  Position Horiz 241 Vert 93

18-Mode of layer, hardlight, opacity at 40
19-Merge all visibles
20- Adjust / Light and contrast
( optional, dépends on your colors)

21-selection tool 

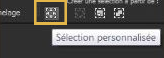

22-Transform selection into layer
23-adjust, blur, gaussien blur at 10
24-layer, new layer ( Raster1)
25-Fill with color 3
26- Sélection / modify/ contract 20
27 -Fill with color 1
28 -Sélection/modify/contract 5
29 -fill with color 3
30 -Sélection /modify of 5
31- Suppress on keyboard 
32-Selection inverse
33 -Effect Screenworks / Lace screen défault ( 113)
34-Effect drop shadow 0/0/50/20 black

35-Sélection / inverse
36-Open tube Nikita flower
37-Copy into selection
38-adjust, sharpness, more sharpness
39-Deselect
40-Merge down
41-drop shadow 0/0/50 20 black, same values as in point 34
42-duplicate layer
43-adjust / radial blur

44-layer organize move down
45-Effect Toadie / Ommadawn

46-Mode of layer on overlay opacity 100
47- Layer new layer raster 1
48-selection tool 


49-Fill with color 2
50-Sélection/ modify/contract of 5
51-fill with color 1
52-Sélection / modify/ contract of 2
53-Fill with color 2
54-Effect Screenworks / Lace screen same as in point 33
55-Ne rien sélectionner
56-Effect drop shadow 2/2/50/10 black

57-Effect Toadie Ware are you ?
( Toadies filter is in material, use this one, as in unlimited
you won't have same result)

58-duplicate layer
59-merge down
60-Mode of layer on Luminance L /Opacity at 90

61-Effect personnal Embosse 3
or adjust sharpness, sharpness
62-Go to merged layer
63-layer new layer
64-fill with white layer
65-Open mask Narah_mask_Abstract86
66- Layer of mask from image

67-Merge groupe
68- drop shadow 1/1/50/ 10 black

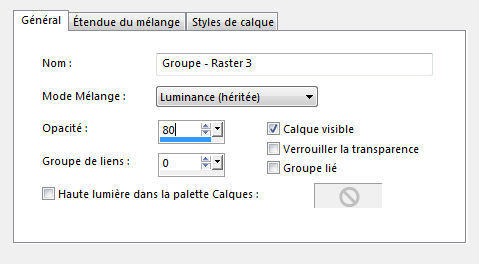
69 -Mode of layer Luminance L /Opacity of layer at 80
70- Image Mirror
71 – Image flip
72-Open déco chain
73-paste as bew layer
74- sélection tool Position 82/ -25

75-Move layer under the layer of the frame
76-Add a border of 1 color 4
77-Copy
80-Add a border of 2 white color
81-Add a border of 1 color 4
82-Sélect all
83-Add a border of 35 white color
84-Sélection inverse
85-Copy memorized image into selection
86-adjust,blur, gaussian blur at 10
87-Transform sélection into layer
88-Effect Gallery H / reverb défault
89-adjust, sharpness, sharpness
90-Selection inverse
91 -drop shadow 0/0/50/40 black

92- deselect
93 - Merge all visibles
94-Open Word Art de Jewel
95- paste as new layer
96-Resize at 70 %
97- sélection tool Position horiz 312 vert 279

98-Open tube, woman of Tocha
99- paste as a new layer
100- Image/ Mirror
101-Resize at 68%
102-Place on right
103-drop shadow
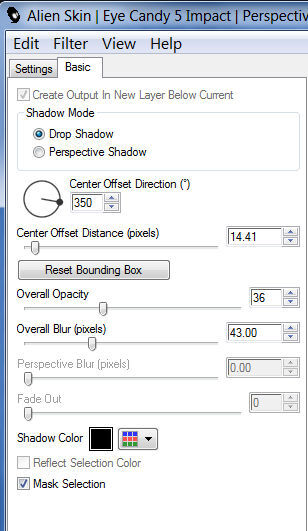
104-Eyes impact5 / Perspective shadow / preset Abisha shadow
(Paramèters if preset doesn't work)
105- add a border of 1 color 4
106- Add a border of 1 color 2
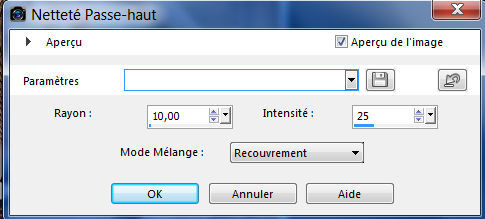
107- adjust / sharpness/ sharpness high pass 10/25
Sign
Resize at 900 pixel width
Than You
Feline C31


/https%3A%2F%2Fekladata.com%2FYPI8DwfBf4bU6fHRpkzcSxO2pDU%40500x338.jpg)
/https%3A%2F%2Fekladata.com%2F_hXetnNky_6mWLePzNC4_ZUg_NQ%40500x364.jpg)