
/image%2F0654964%2F20241204%2Fob_9a5cd9_unnamed.jpg)

This tutorial is a personal creation.
It is forbidden to Edit / Copy or distribute it without my permission.
Any resemblance to another is pure coincidence.
Please do not remove the watermark from the tubes provided
respect the work of the tubers, thank you.

Translated by Dennis
Thank you my friend


EQUIPMENT
Tube of Luz Cristina (not supplied)
Cicka misted tube
Decor tube
Flake tube
Tube ribbons
Tube pendant balls
golden texture

FILTERS
Andromeda
Mura's Seamless
Texture
Transparency
I used the following Colors
Blue #8983a1
Cream #f9e6c3

1.
Open a New Transparent Image 900 x 600 pixels
Flood Fill the Layer with 8983a1 the blue color
Selections / Select All
Edit / Copy
Edit / Paste the misted tube (25t.png) into the Selection
Selections / Select None
Effects / Image Effects / Seamless Tiling

Adjust / Blur / Gaussian Blur 20
2.
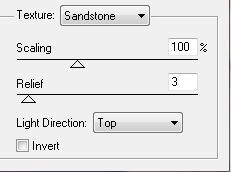
Effects / Plugins / Texture / Texturizer
Open the Misted Tube (t25.png)
Edit / Copy
Edit / Paste as a New Layer
Resize if needed
I Resized 85%
5
Image / Mirror / Mirror Horizontal
Place on the Left (see Example)
3.
Layers / New Raster Layer
Flood Fill with Foreground Color
Andromeda Designs Filter
choose in Category “Scales”
then in Pattern #1
(to choose, activate the small + and -)
set the values as follows
(if you have any problem with this filter, there is a Layer
in the Materials, which you can colorize afterwards)

Effects / Plugins / Transparency / Eliminate Black
Adjust / Sharpness / Sharpen
Effects / Plugins / Mura's Seamless / Emboss at Alpha (default)

Layers / Properties / Blend Mode / Luminance (or other according to your colors)
(You can lower the opacity of this Layer if you want
so the Misted Tube is Visible)
4.
Edit / Copy the Tube decor
Edit / Paste
Image / / Mirror / Mirror Horizontal
Place in the Top Left Corner
View / Rulers
Activate the Pick Tool / Drag Down
Then with the Left Node Drag from right to left to about 550-pixels
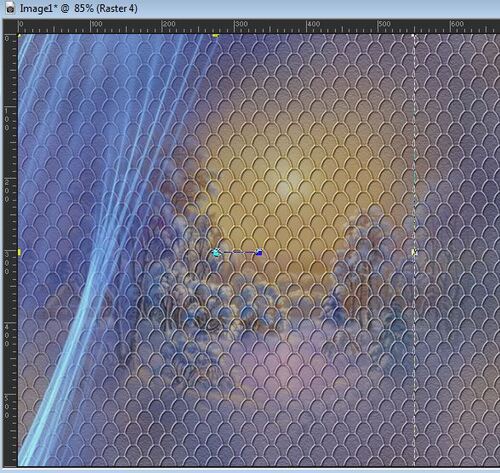
Blend Mode of your choice / Normal /Luminance or other
Adjust / Sharpness / Sharpen
Effects / Plugins / Mura's Seamless / Emboss at Alpha (default)
5.
Edit / Copy the tube flocons/png (snowflakes)
Edit / Paste as a New Layer
place a little to the left (not too close to the edge / allow for the frame)
Adjust / Sharpness / Sharpen
Effects / 3d Effects / Drop Shadow / 0 / 0 / 60 / 40 Black

Edit / Copy the Tube decoboules.png (hanging ornaments)
Edit / Paste
Place as on the Example
Adjust / Sharpness / Sharpen
Effects / 3d Effects / Drop Shadow / 0 / 0 / 60 / 40 Black
6.
Image / Add Borders of 2 px cream color
Image / Add Borders of 3 px color blue
Image / Add Borders of 3 px neutral color
Select this last border with the Magic Wand
Open the texture.or.jpg
Edit / Copy
Edit / Paste into Selection
Selections / Select All
Edit / Copy
Image / Add Borders of 45 px neutral color
Selections / Invert
Edit / Paste into Selection
Adjust / Blur / Gaussian Blur 20
7.
Effects / Plugins / Texture / Texturizer (Sandstone / 100 / 3 / Top)
Effects / Edge Effects / Enhance
Adjust / Sharpness / Sharpen
Selections / Invert
Effects / 3d Effects / Drop Shadow / 0 / 0 / 60 / 40 Black
Selection / Invert
Selections / Modify / Select Selection Borders

Effects / 3d Effects / Drop Shadow / 0 / 0 / 60 / 40 Black
Edit / Repeat Drop Shadow
Selections / Select None
8.
Edit / Copy Edit / Paste your character tube
resize as needed
place to the right
Drop Shadow of choice
Layers / Merge / Merge Visible
Image / Add Borders of 2 px Background Color
Image / Add Borders of 3 px Foreground Color
Image / Add Borders of 3 px Neutral Color
Activate the Magic Wand Tool / Select the Neutral Border
Edit / Copy the gold texture
Edit / Paste into Selection
Selections / Select None
9.
Edit / Copy decorative tube ribbon
Edit / Paste
Image / Resize to 50%, (all layers not checked)
Place in the Top Left Corner
Adjust / Sharpness / Sharpen
Effects / 3d Effects / Drop Shadow / 0 / 0 / 60 / 40 Black
10.
Layers / New Vector Layer
Activate the Text Tool
Choose a font you like, and write
With the Golden Texture in the Materials Palette
Write
“A Porcelain Christmas”
In the Layers Palette convert the Layer to a Raster Layer
Effects / 3d Effects / Drop Shadow of choice
Place where you like it
Sign / Merge / Save
Thank you for doing this tutorial
It will be a real pleasure for me to add
it to the gallery at the end of the tutorial
please send me your creation, as address on blog
Thank you Dennis for this translation
an beautiful creation


/https%3A%2F%2Fekladata.com%2FYPI8DwfBf4bU6fHRpkzcSxO2pDU%40500x338.jpg)
/https%3A%2F%2Fekladata.com%2F_hXetnNky_6mWLePzNC4_ZUg_NQ%40500x364.jpg)