
/image%2F0654964%2F20241204%2Fob_9a5cd9_unnamed.jpg)

Lien sur image
This tutorial belongs to Feline C 31
This translation belongs to Evanescence

LIFE
BY
FELINE C 31

MATERIAL

Thanks to for Lady tube
to PspDevil for man tube
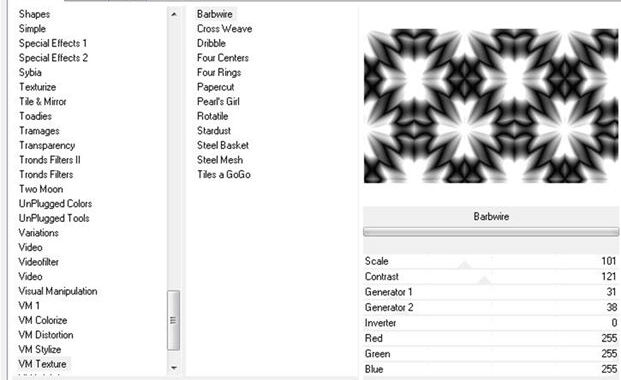
Filtre Unlimited / VM Texture / Barbwire
Filtre AAA Frame/ Foto Frame
Filtre Toadie / Weaver
Filtre / adjust Variation
1-Open one transparent layer 900/550 pixels
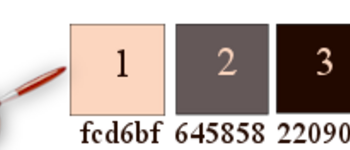
2-Prepare a linear gradient 0/0 inverse checked
colors 1 et 2

3-Put gradient in your layer
4-Duplicate (copy of raster1)
5-Plugin Unlimited /Vm texture Barbwire , défaut
6-Blend Luminance L Opacity 15

7-Effect, image effects/ sorting tiles
corner, bidirectionnal, linear, transition at 100

8-Effect, edge effects, enhance
9-Merge down
10-duplicate layer
11-Resize at 85%
12-Sélect all
12 a- floating Sélection
12 b- static Sélection
13 Add new layer (raster 2)
14-Put white color in your foreground palette
15- and fill it with this color
16- selection modify Contract of 2

17-clic on suppress 
18-Merge down
19-select none
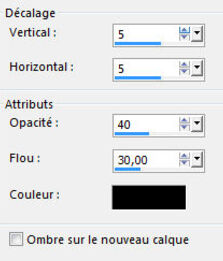
20-Drop shadow /5/5/70/30 black

21-layer duplicate (Copy (2) on Raster 1)
22-Image resize at 85%
sélection Tool 
23-Position 88/60

24-Duplicate again this layer (Copy of copy (2) sur Raster 1)
25-Image resize at 85%
sélection Tool
26-Position 124/93

27- Personnal Sélection see icones 


28-Adjust/ blur, gaussian blur at 30

29-Effects, texture effects / texture , choose contraste papier

30-Open the landscape tube or yours
31-paste in your sélection
32-Adjust, sharpness, sharpness
33- select none
34-Close visibility of this layer

35-Go to layer just under
36-Merge all visible layers
37-Re open layer on top
(Copy of Copy (2) on Raster 1)
38-Duplicate (Copy (2) on Copy (2) on Raster 1)
39-Effect Toadie weaver , defaut

40-move down once
41-Effect , image effect , seamless tiling like at point 7
42-Blend mode of layer darken Opacity 100

43-Go on top of pile (Copy of copy (2) on Raster 1)
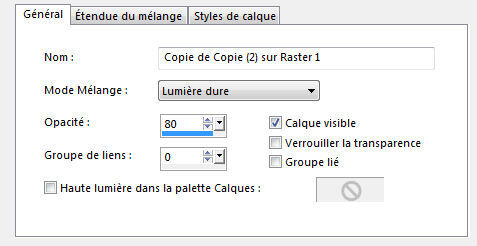
44-Blend mode of layer hard light Opacity 80
45-Merge all visible layers
46-Pluhin Adjust Variation / Click on original once
Clicl once on More cyan
or other according your colors

47-Open tube Silent winter
48-paste it as new layer (raster1)
49-Resize at 85%
sélection Tool
50-Position 537/29

51-adjust, sharpness, sharpness
52-Drop shadow 5/5/30/20 black

53-Open tube Deco rond
54-paste it as new lauer (raster2)
sélection Tool
55-Position 325/31

56-Blend of layer on luminance /Opacity 85

57-Open tube texte
58-paste it as new layer (raster3)
sélection Tool
59-Position 470 / 121

60-Blend Mode Luminance L
61-Drop shadow 5/5/30/10 black

62-Open tube lady Guismo
63-paste it as new layer (raster4)
64-Image mirror
65-Resize at 70%
sélection Tool
66-Position 25/21

67-Drop shadow -10/-10/20/20 noir

68-Open tube man pspDevil
69-Copy as new layer (raster5)
70-Resize at 75 %
sélection Tool
71-Position 114/3

72-adjust , sharpness, sharpness
73-Drop shadow 5/5/40/30 noir
74- Merge all visible layers
75-Copy
76-Add a border of 1 color 2
77-Sélect all
78-Add a border of 15 color 3
79-Inverse selection
80-Copy in sélection , image you copied before
81-Plugin Graphic plus /cross shadow défaut

82-Filter Foto Frame

83-Sélect all
84-Sélection / contract of 13
85 drop shadow 0/0/80/40 black
86- select none
87-Add a border of 1 color 1
88-Add a border of 1 color 3
Sign tour création
Resize at 900 pixels width
Thank you for doing my Tutorial
I hope you enjoyed it
Féline C 31
My version
Lady tube of Mara Pontés that I thank
tube of clock found on the net no name


/https%3A%2F%2Fekladata.com%2FYPI8DwfBf4bU6fHRpkzcSxO2pDU%40500x338.jpg)
/https%3A%2F%2Fekladata.com%2F_hXetnNky_6mWLePzNC4_ZUg_NQ%40500x364.jpg)