


-
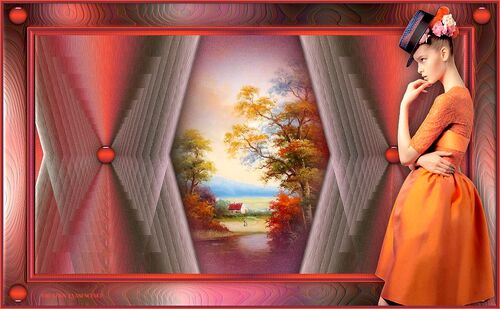
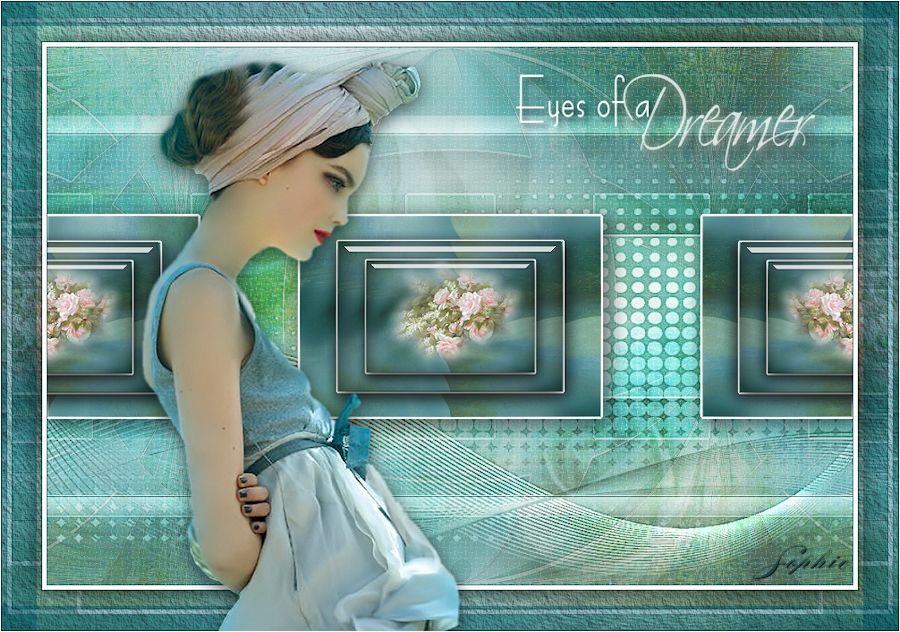
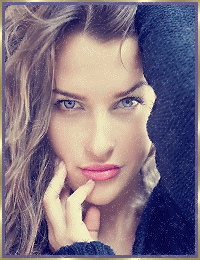
Eyes of a dreamer

Link on image
EYES OF A DREAMER
BY
FELINE C31

MATÉRIEL


FILTRES
Mura’s Seamless / / Tile rotate
Place it in unlimited2 otherwise you won't have same result
Simple/ Zoom out and flip
Place it in unlimited2 otherwise you won't have same result
Eye Candy Impact / Glass
Toadie / What are you ?
AAA Frame/ Texture Frame
Adjust Variation
1- Open a transparent layer 900/6002-Sélect all
3-Copy in sélection the background in material eyes of dreamer
4-Deselect
(Change according your choosen colors with adjust filter or else)
5- Duplicate layer
6-Effect Mura Seamless Tile rotate

7-Effect distorsion / Twirl 100

8-Resize at à 75%
9-Effect simple / zoom out and flip
you have this

10-Sélection all
Sélection floating
Sélection static
11-Sélection /modify , borders of selection
outside

12-Fill it with white
13-Drop shadow 0/0/100/1 black
14-select none
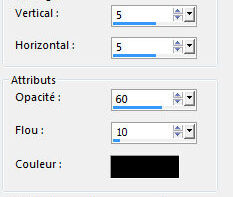
15-Drop shadow portée 5/5/60/30 black color
16- duplicate layer
16-On original (Copy of raster 1)
Effect, geometric effect (circle enroulement)

17- Mode of layer on hard light
18-Opacity on 30 %
19-Effect edge borders, accentuate
20-On top of pile ( copy (2) of raster 1)
select tool

21-Personnal selection, see icone


22-Inverse selection
23-
 ( suppress)
24-deselect
25-duplicate layer
26-On the original (Copy 2 of raster 1)
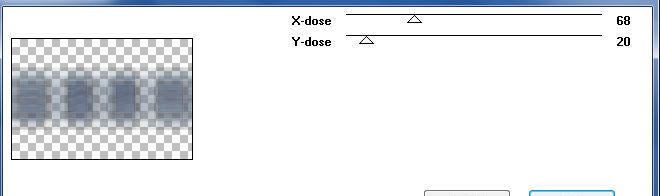
27-Effect Toadie / Waht are you /68/20
28-Mode of layer on overlay /Opacity at 80
29-Effect, edge effect, accentuate
On top of the pile (Copy of copy (2) of Raster 1)
30-Personnal selection
sélection tool
personnal selection

31- Promote selection as layer
32-deselect
33-Resize at 75%
34-ërsonnal selection
selection tool
Personnal Selection

35-Eye Candy Impact / Glass

36-Deselect
37-Duplicate layer
38-Resize at 75 %
39-Merge down ( with promote sélection )
40-Open tube fleur Blue-Flower-Misted-36-Azalee
or yours
41-Copy as new layer
42-Resize at 18% or more or less depends of your tube
Tool sélection

43-Position Horiz 376 Vert 221

44-Merge down
45-Duplicate layer
Selection Tool
46-Position Horiz -147 Vert 202

47-duplicate layer, image mirror
48-Merge down 2 times
49-Adjust, sharpness, sharpness
layers

50-Go on copy (2) of raster 1
(see with your choosen colors)
60-Filter Adjust Variation
1x on original / 1x more red/ 1x more green

61-Go on layer copy of raster 1
62-New layer
63-Fill with white
64-Open mask LF-Mask-163
65-Layer
new layer of mask from image (inverse marked)

66-Merge group
67-Mode on overlay opacity at 100
68-adjust sharpness, more sharpness
69-Go to ( raster1)
70-Open tube fleur de Azalee Flowers-Misted-35-Azalee
or yours
71-Copy as new layer ( raster1)
Don't move
72-Mode of layer on overlay or else
73-Opacity on 40
74-Open déco 1 eyes of a dreamer
75-Copy as nex layer
don't move
76-Mode of layer on overlay opacité 100
77-Go on raster 1
78-Effect texture weave

79-add a border of 1 color 2 (all layers not marked)
80-Copy
81-Add a border of 5 white color
82-Add a border of 1 color 2
83-Add a border of 45 white color
84-Sélect this border with magic wand
85-Copy image you have in memory into sélection
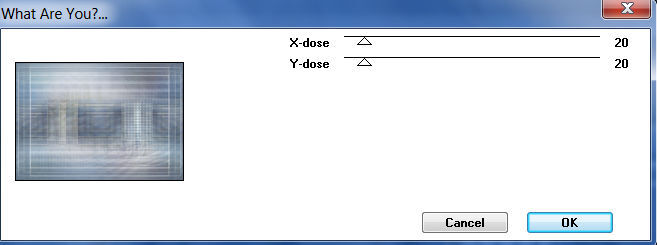
86-Effect Toadie what are you ? 20/20
87-Effect filtre AAA Frame /Texture Frame

88- Inverse selection
89-drop shadow 0/0/80/40 black color
90-deselect
91-Open tube lady Guismo or yours
92-Resize if necessary at 78%
93-Tool sélection
Position Horiz 191 Vert 6

94-Put drop shadow

95-Open text Eyes of a Dreamer
96-Copy as new layer
Tool sélection
Position Horiz 576 Vert 76

Drop shadow 5/5/60/10 black color
add one border of 1 white color
Sign and resize at 900pixels

I Thank you for having make my tutorial
and i hope you enjoyed it
Feline
My version
Tube femme de Luz Cristina que je remercie
Tube fleur 1 trouvé sur le net
Tube fleur 2 Azalée créations que je remercie

-
Pour accéder aux tutos des créateurs
cliquez sur le cœur
en dessous de leurs
bannières

-

Derniers Articles
-

Lumières d' Automne
-


-


-


-

-


-


-

-

-


-


-


-


-


-


-

-

cliquez sur le logo au dessus site amis pour ouvrir la page
-

-

-


-


Pour mettre mes bannières
sur votre site ,cliquez sur l'une d'elles vous aurez les codes pour les incorporer
To put my banner on your site, just click on anyone of the two you have and you will have the codes on the opening page
-
-

-
Allez visiter le site de Rénée Graphisme pour vos filtres et plein d'autres choses encore
-
Livre d' Or


