


-
Par Evanescence* le 26 Juin 2017 à 23:11

Link on tag
This tutorial is property of Claurette graphisme
This translation is property of Evanescence


MATERIAL

PLUGINS

Colors of this tutorial

1
Open a new layer of 900/600 px
foreground dark color : #2c3d1d
background light color : #9cc17b
2
fill raster 1 with dark color : #2c3d1d
Ttexture effect , texture in material

3
layer new layer raster 2
fill with white color
4
Open félicité mask
layer of mask from image

adjust, sharpness, sharpen more
merge group
Effect 3D/ drop shadow 0/0/75/28 black
duplicate layer
Effect 3D/drop shadow 0/0/75/28 : #2c3d1d
merge down
***
5
close this layer
(go on raster 1 )
filter Redfied …/Ripples Magiv ….
don 't mark anything, just take bow preset

sélection tool K

pull layer on each side so we don't see white color anymore

you shoud have this

6
Open visibility of upper layer
Open selection tool S

stay on this layer
transform selection into layer
7
put colors as shown in palette
light as foreground : #9cc17b
dark color as background : #2c3d1d

take color pot tool and put opacity at 50%

fill selection with light color ... #9cc17b ...
put opacity back at 100 %
8
Open félicité landscape tube
copy paste as new layer
Sélection inverse
delete on keyboard
selection none
9
go on top of pile layer
personnal filter Emboss3
go on layer , transform selection
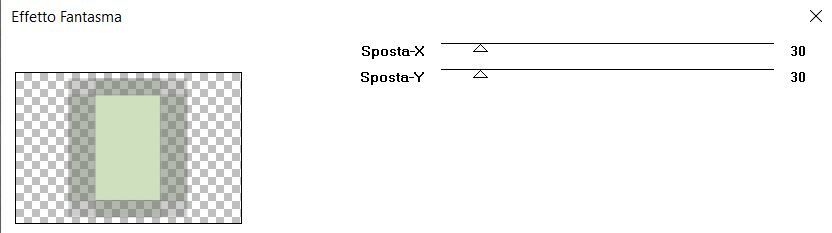
filter / Italian Editor Effect …/ Effetto Fantasma 30/30
Effect 3D / drop shadow ...2/2/75/4 : white #ffffff
put mode of raster on hard light

10
go on first layer , bottom of pile , close visibility
merge visible layers
then open visibility
you should have this

11
Open déco 1 C.L
Copy and paste as new layer
don't move it
12
Open tube déco 2 C.Laurette
Copy and paste as new layer
Image effect offset -384/ -8

drop shadow -4/4/75/8 black
Duplicate layer
image mirror
merge down
13
Open tube coin C.L …
Copy and paste as new layer
adjust tint and saturation in your colors
Image Effect d'image , offset - 175 / 236

filter …simple …top let mirror
Effect 3D/ drop shadow 2/2/75/4 black

14
Image add borders
2 pixels white color #ffffff
4 Pixels dark color #2c3d1d
2 pixels white color
select all
image add borders
45 Pixels white color
inverse selection
15
prepare a linear gradient 0/1 inverse marked
foreground : #9cc17b
background : #2c3
fill selection with gradient

adjust, add noise

inverse selection
Effect 3D/ drop shadow 0/0/75/28 black
16
Sélection.../ inverse again
filter … AAA FRAMES …/ Foto frame …

Deselect
17
Open your principal tube
if it s a bought tube, put licence, thanks
Réglage netteté/ netteté
Placer sur la droite ... faite une ombre portée
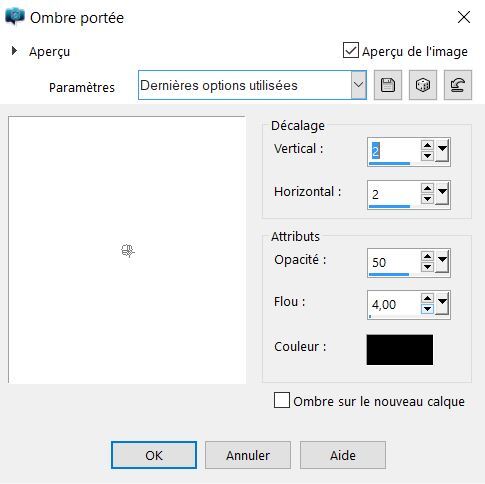
Effet 3D/ ombre portée 0/0/75/28 noir
***
Etape 18
Ouvrir le tube texte
Copy and paste as new layer
Image effect , offset - 247/ 0

select all
Sélection floating
Sélection static
fill selection with gradient

Deselect
Effect 3D / drop shadow 2/2/50/4 black
flatten all layers
19
layer new layer
Sign
image add 2 pixels of white color
resize at 900 pixels
adjust, sharpness, sharpen

Tube de Mina
Tube fleur de Noé
merci

-
Pour accéder aux tutos des créateurs
cliquez sur le cœur
en dessous de leurs
bannières

-

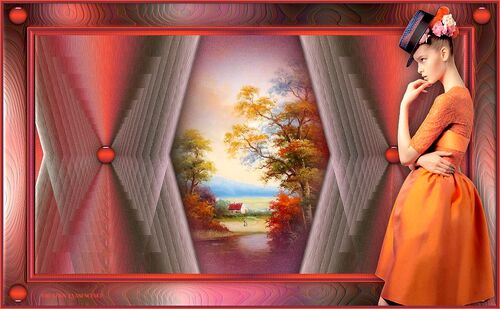
Lumières d' Automne
-


-


-


-

-


-

-

-


-


-


-

-


-


-

-

cliquez sur le logo au dessus site amis pour ouvrir la page
-

-

-


-


Pour mettre mes bannières
sur votre site ,cliquez sur l'une d'elles vous aurez les codes pour les incorporer
To put my banner on your site, just click on anyone of the two you have and you will have the codes on the opening page
-
-

-
Allez visiter le site de Rénée Graphisme pour vos filtres et plein d'autres choses encore
-
Livre d' Or


