
/image%2F0654964%2F20241204%2Fob_9a5cd9_unnamed.jpg)
ALF
from MARIA JOSE PRADO
BUTTERFLY

Link on image
MATERIAL
That I thank
Matérial to download by click on flower

You can help yourself
to follow tutorial with this arrow

PLUGINS
**********************
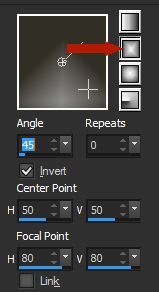
1.- Make a gradient with your 2 colors choosen from tube or else
Dark color at Foreground, clear one at on background
2.- Open in material alpha_alf,
fill it up with your gradient
3.- Plugin Alf's Border X - Border Fade II
(2, 25, 1, 129)

4.- Plugin Alf's Border X - Mirror Bevel - Default (128, 64)
5.- Selections - Load Selection from alpha channel - selection #1
6.- Selections - Promote Selection to Layer
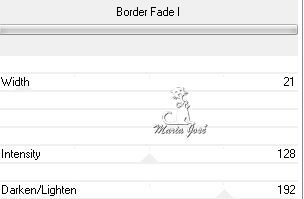
7.- Plugin Alf's Border X - Border Fade I -
(21, 128, 192)
Deselect all
8.- Effects - Image Effects - Seamless Tiling ( see capture for values)

9.- Layers - Duplicate -
Adjust Blur - Radial Blur (see capture)
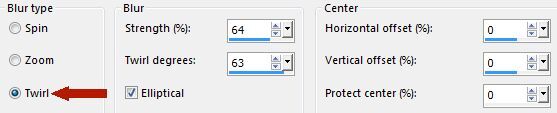
10.- Effects - Image Effects - Seamless Tiling (see capture)
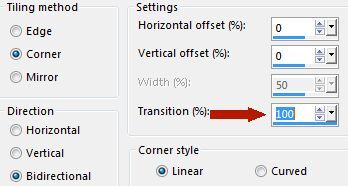
11.- Plugin - L en K's - Raisa

12.- Layer - Duplicate - Image Free Rotate - Right 90 - All layers not checked

13.- Plugin Simple - Half Wrap
14.- Plugin Graphic Plus - Vertical Mirror

15.- Effects - Reflections Effects - Rotating Mirror (180)
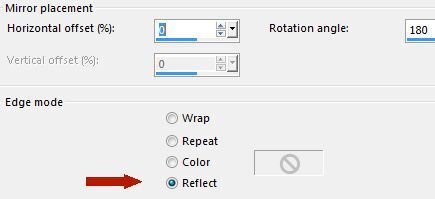
16.- Plugin Alf's Border X - Border Circular Fade (110, 192)
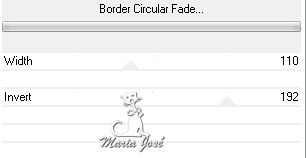
17.- Selections
- Load Selection from alpha channel - selection #2
- suppress or delete -
deselect all
18.- Effects - Drop Shadow 0, 0, 60, 30, black
19.- Activate Promoted Selection (2ª from bottom to top)
20.- Layers - Arrange - Move up
21.- Image - Resize 34% - All layers not checked
22.- Selections -
Load Selection from alpha channel - selection #3
Plugin CPK Designs - Glass Default (19, 46)
Eye Candy 5, Impact - Glass - preset alf_mj
23.- Selections - Selection All - Selections Float - Selection Defloat
24.- Plugin AAA Frames - Foto Frame
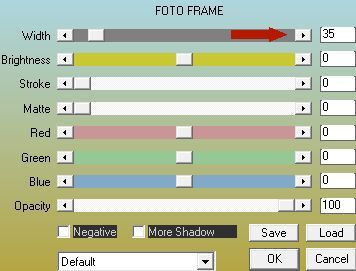
Repeat AAA Frames

25.- Deselect all -
Image - Free Rotation - same configurations as above
26.- Image - Image Effects - Offset

27.- Effects - Reflections Effects - Rotating Mirror, same configurations above
28.- Copy and paste as new layer - alf_deco
29.- Image - Image Effects - Offset

30.- Layer - Merge Down -
put Blend Luminance (L) or else adapted to your choosen colors
Drop Shadow 0, 0, 60, 30 black color
31.- Effects - Image Effects - Offset

32.- Activate Copy of Promoted selection (2ª from bottom to top)
Effects - Reflections Effects - Rotating Mirror - same configurations as above
33.- On raster 1 - Plugin L en K's - Zitah (see capture for values)

Plugin FM Tools - Blend Emboss - Default
34.- On this same layer - Selections
Load Selection from alpha channel - selection #4
Promote selection to layer - Arrange - Move Up 2 times
Plugin - Carolaine & Sensibility - CS_LDots

Copy and paste your misted tube, landscape or else as new layer
Image - Resize if needed - Ajust to your taste
Selection - Invert - suppress or delete - Selection Invert again
Put opacity between 60 e 75% (here 75%)
Layer - Merge Down - Drop Shadow 0, 0, 60, 30, black
Deselect all
35.- Close visibility of Promoted Selection (the one on top)
at that time look for position of your layers
Activate any inferior layer and merge all visible layers

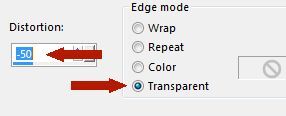
36.- Layer - Duplicate - Effects - Geometric Effects
Perspective Vertical (-50) transparent
Take selection tool, arrow, and display scale
procede like the capture abaixo (Tecle letra M)
put down your layer to 440 px

37.- Effects - Geometrique Effects - Spherize -
Drop Shadow 0, 0, 60, 30, black

Copy and paste deco spectrum as new layer
38.- Open visibility of your layer promoted selection
and merge all visible layers

39.- Image - Add Borders - 1px dark color
Image - Add Borders - 5px clear color
Image - Add Borders - 1px dark color
40.- Selections - Select All - Edit copy
41.- Image - Add Borders - 50px white color
Selections - Invert - past into selection your copied image kept in memory
42.- Plugin - Graphic Plus - Vertical Mirror Default (128, 0)
43.- Plugin FM Tools - Blend Emboss - Defaut
44.- Selections - Invert - Drop Shadow 0, 0, 80, 40, black
45.- Deselect all - Copy and paste your tubes , lady or else,and decorativ ones
- Drop Shadow on your choice
46.- Image - Add Borders 1px dark color
47.- Image - Resize 900px Width -
Sign your création and save as jpg
I thank you for having followed my tutorial
ans I hope you liked it
Maria José

My version
Lady tube by Mina
Fower tube by Tatie
Landscape tube by Guismo
that I thank


/https%3A%2F%2Fekladata.com%2FYPI8DwfBf4bU6fHRpkzcSxO2pDU%40500x338.jpg)
/https%3A%2F%2Fekladata.com%2F_hXetnNky_6mWLePzNC4_ZUg_NQ%40500x364.jpg)