
/image%2F0654964%2F20241204%2Fob_9a5cd9_unnamed.jpg)

Link on image
V I C T O R I A
B Y
J O A N N E

MATERIAL
Click on flower to download

A big thank to Grisi for woman tube
to Azalée Créations for landscape tube
to nikita for greens tube
and Babe Designs for the mask
PLUGINS
you 'll need emboss 3 for this tutorial
Help yourself with this arrow to follow tutorial


1/ place your selections in your files
2/ in colors put in foreground D0B9B2
And in background 846666
3/ make a linear gradient

4/ open a new layer 800 x 600 and fill it with gradient
5/ Duplicate layer, close visibilty of copie and go to the first one
6/ Effects, Art media effect, brushstroke

7/ close this layer, open the other one
8/ Add new layer of Mask from picture
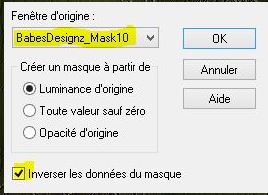
9/ Merged group
10/ personnal plugin emboss 3
11/ charge selection from disk
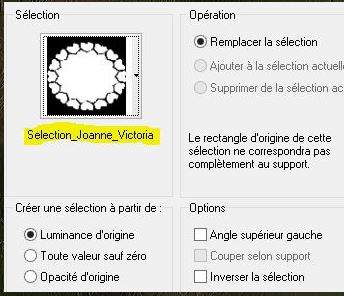
12/ supress or delete, deselect
13/ Duplicate Layer, merge all visible layers
14/ Drop shadow , effects 3D

15/ Drop shadow again in négatives values ,
vertical and horizontal
-5
16/ go to layer at the bottom and open it
17/ copy and paste layer of landscape
18/ go to layer on top
19/ Effects, Image Effects, offset

20/ duplicate layer and merged down
21/ go to layer on the top
22/ copy and paste tube of green branches
23/ Effects, image effects, offset

24/ Drop shadow again same as in points 14 and 15
25/ copy and paste lady or other tube, resize to 70 %
26/ put it as model tag
27/ Repeat drop shadow same as point 14/15 , stay on this layer
28/ Image, size of support

29/ Add a new layer, put the gradient you made before
30/ select, select all, modify, contract 34 pixels
31/ supress or delete, inverse selection
32/ Effects 3D , Inner Bevel

33/ Drop shadow

34/ Do this shadow again with negative -5
35/ Duplicate layer, Deselect
36/ copy and paste my watermark , which is in material
37/ sign your version
38/ Merged all
39/ register as jpg
I thank you for having done my Tutorial
I hope you enjoy it
Joanne



/https%3A%2F%2Fekladata.com%2FYPI8DwfBf4bU6fHRpkzcSxO2pDU%40500x338.jpg)
/https%3A%2F%2Fekladata.com%2F_hXetnNky_6mWLePzNC4_ZUg_NQ%40500x364.jpg)